|
Wait
DEDICATÓRIA
Dedico à querida amiga Eliana Chamon.
TRADUÇÕES

MATERIAL

Preset: Preset_Lights_circuloslc1 (guarde em sua pasta de Presets do My PSP Files)
Tubes: tube1883_mulher_mara_pontes
radi_paisaje_026
mtfp_254
Elementos: decolc1
decolc2
Mask: !!!!gradientedworisch
Marca-d'água.
Efeitos do PSP.
Versão usada: PSP X6.
PLUGINS
Plugin Galaxy → Feedback
Plugin MuRa's Meister → Pole Transform
Plugin MuRa's Meister → Perspective Tiling
Plugin Richard Rosenman → Halftone
Plugin I Decay → Spiral Diffuse
Plugin FM Tile Tools → Blend Emboss
Plugin Nik Color Efex Pro 1.0 → Graduated User Defined
TUTORIAL

|
Esta seta marca sua linha
Clique e arraste para movê-la
|
|
1_.
Abra uma nova imagem transparente de 1000 x 700 px.
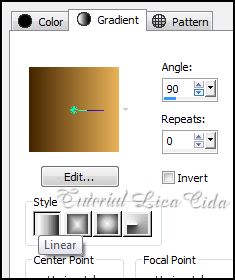
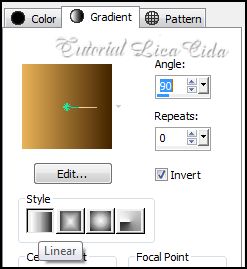
Pinte com o gradiente formado pelas cores #442400 e #e8b258.
Configure: Style: Linear — Angle: 90 — Repeats: 0 — Invert desmarcado.
2_.
Layers → New Raster Layer.
Selections → Select All.
Edit → Copy no tube tube1883_mulher_mara_pontes
Edit → Paste Into Selection.
Selections → Select None.
3_.
Effects → Image Effects → Seamless Tiling: Default.
4_.
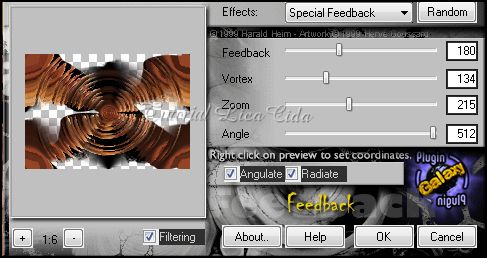
Plugin Galaxy → Feedback (aplique três vezes).
5_.
Adjust → Add/Remove Noise → Add Noise — Uniform e Monochrome marcados — Noise: 10.
Layers → Merge → Merge Down.
6_.
Image → Canvas Size: 1000 x 800 — Bottom: 100.
7_.
Effects → Geometric Effects → Perspective - Vertical: -40 — Transparent.
8_.
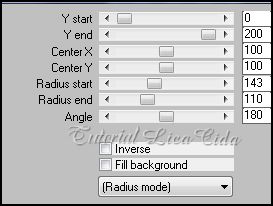
Plugin MuRa's Meister → Pole Transform.
9_.
Layers → New Mask Layer → From Image: !!!!gradientedworisch.
Layers → Duplicate.
Layers → Merge → Merge Group.
10_.
Layers → New Raster Layer.
Layers → Arrange → Move Down.
Pinte com o gradiente formado no item 1, alterando: Invert marcado.
11_.
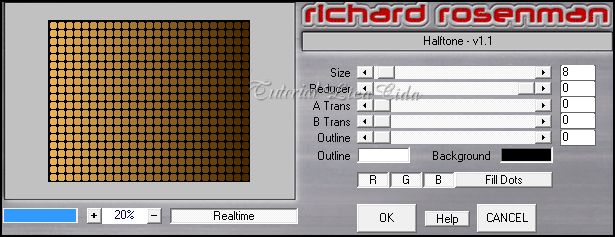
Plugin Richard Rosenman → Halftone.
12_.
Plugin MuRa's Meister → Perspective Tiling.
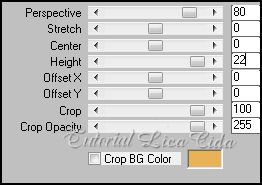
Com a ferramenta Magic Wand (Default), selecione a parte transparente.
Selections → Modify → Feather: 60 px.
Pressione Delete três ou quatro vezes.
13_.
Layers → New Raster Layer.
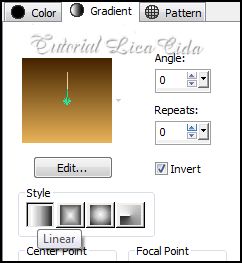
Pinte com o gradiente formado no item 1, alterando: Angle: 0.
14_.
Repita o item 5: Adjust → Add/Remove Noise → Add Noise — Uniform e Monochrome marcados — Noise: 10.
15_.
Plugin FM Tile Tools → Blend Emboss: Default.
16_.
Edit → Copy no elemento decolc1
Edit → Paste As New Layer.
17_.
Plugin I Decay → Spiral Diffuse.
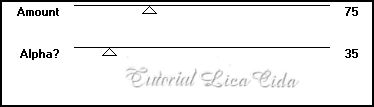
Layers → Merge → Merge Down.
Layers → Arrange → Send to Bottom.
18_.
Edit → Copy no elemento decolc2
Edit → Paste As New Layer.
19_.
Edit → Copy no tube radi_paisaje_026
Edit → Paste As New Layer.
Redimensione de acordo com o tube usado (usei 120%).
20_.
Ative a ferramenta Sharpen e use sobre a paisagem.
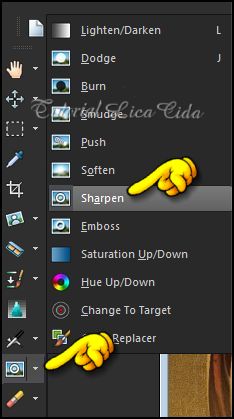
Configure: Default.
Caso queira alterar as configurações, mude Density e Opacity de acordo com o tube usado.

21_.
Duplique a layer superior (Group - Raster 1).
Repita o item 11: Plugin Richard Rosenman → Halftone.
22_.
Effects → Image Effects → Offset: 8 / 0 — Custom e Transparent marcados.
Layers → Arrange → Move Down.
23_.
Effects → 3D Effects → Drop Shadow: 20 / 17 / 50 / 20,00 — Color: #000000.
Use nos dois círculos.
24_.
Ative a Raster 2.
Plugin Nik Color Efex Pro 1.0 → Graduated User Defined.
Color: #442400 (cor usada no Foreground).
Use o plugin nos efeitos, alternando as cores #442400 e #e8b258. Dê preferência ao tom escuro, para maior realce.
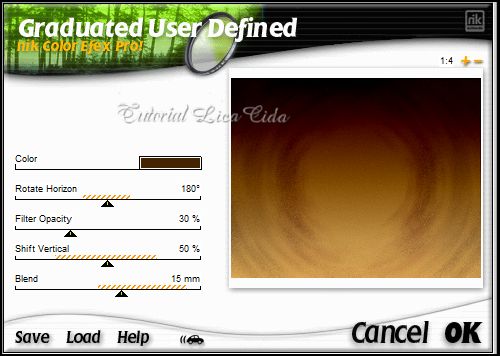
Altere os Blend Modes e a Opacity das layers.
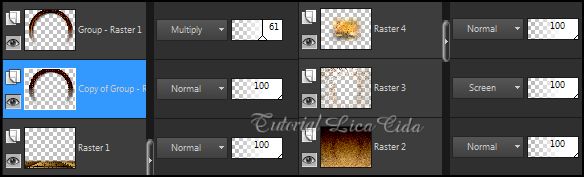
25_.
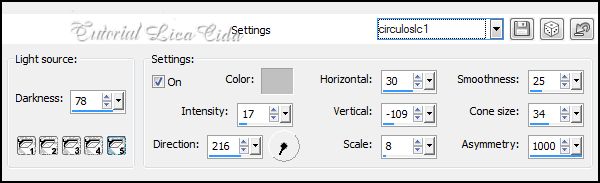
Ative a Raster 3.
Effects → Illumination Effects → Lights → Preset: Preset_Lights_circuloslc1.
26_.
Ative a layer superior.
Edit → Copy no tube tube1883_mulher_mara_pontes
Edit → Paste As New Layer.
Posicione.
27_.
Edit → Copy no tube mtfp_254
Edit → Paste As New Layer.
Posicione.
OPCIONAL
Altere os Blend Modes e a Opacity das layers.
Faça o acabamento a gosto.
Aplique a marca-d'água.
Assine e salve.
Espero que gostem.
Aparecida / LicaCida, maio de 2014.
Rio de Janeiro - Brasil.

VOLTAR
Copyright ©2026 - Web Design - Naise Minas
|


