|
Vera Mendes
TRADUÇÕES

MATERIAL

Seleções: alphachannel_lc — Selection #1, #2, #3 e #4
(guardadas no canal alfa da imagem).
Preset: katrina (mp) — Eye Candy 5: Impact → Glass --
Dê um duplo clique no preset para importá-lo ao plugin.
Tubes: Gabry-women 190-17
Automne_oiseau_sur_branche_CibiBijoux
Word Art: 004_yoursmile
Back: back finallc
Decos: deco1lc
deco2lc
Marca-d'água.
Efeitos do PSP.
Versão usada: PSP X8.
PLUGINS
Plugin Alf's Border FX → Mirror Bevel
Plugin AP [Lines] → Lines - SilverLining
Plugin Toadies → What are you?
Plugin VanDerLee → Unplugged-X → Vertical Tile
Plugin dsb flux → Linear Transmission
Plugin Carolaine and Sensibility → CS-Texture
Plugin Nik Software → Color Efex Pro 3.0 → Bi-Color Filters
Plugin Mehdi → Sorting Tiles
Plugin Alien Skin Eye Candy 5: Impact → Glass
Plugin MuRa's Meister → Copies
TUTORIAL
|
Esta seta marca sua linha
Clique e arraste para movê-la
|
|
Configure: Foreground: #440405 — Background: #ff7b75.


1_.
Abra o alphachannel_lc, duplique (Shift + D) e feche (minimize) a original.
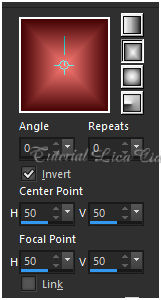
Pinte com o gradiente formado pelas cores acima.
Configure: Style: Rectangular — Angle: 0 — Repeats: 0 — Invert marcado — Center Point: H: 50 / V: 50.
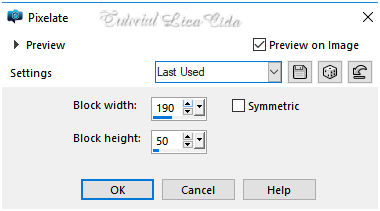
Effects → Distortion Effects → Pixelate.
Plugin Alf's Border FX → Mirror Bevel: Default (128 / 64).
Effects → Edge Effects → Enhance More.
2_.
Selections → Load/Save Selection → Load Selection From Alpha Channel → Selection #1.
Layers → New Raster Layer.
Pinte com a cor mais escura (Foreground).
Selections → Modify → Contract: 2 px.
Com a ferramenta Flood Fill (Opacity: 60%), pinte com a cor mais clara (Background).
Selections → Select None.
Plugin AP [Lines] → Lines - SilverLining.
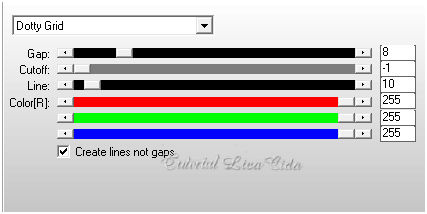
Plugin Toadies → What are you?.
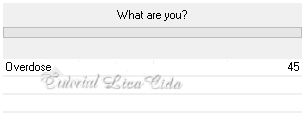
Effects → 3D Effects → Drop Shadow: 10 / 10 / 50 / 20,00 — Color: #000000.
Effects → User Defined Filter → Emboss_3.
3_.
Selections → Load/Save Selection → Load Selection From Alpha Channel → Selection #2.
Layers → New Raster Layer.
Com a ferramenta Flood Fill (Opacity: 60%), pinte com a cor mais escura (Foreground).
Selections → Select None.
Plugin VanDerLee → Unplugged-X → Vertical Tile: Default.
Effects → Reflection Effects → Rotating Mirror — Horizontal Offset: 0 — Rotation Angle: 180 — Edge mode: Repeat.
Effects → User Defined Filter → Emboss_3.
Layers → Duplicate.
Effects → Image Effects → Seamless Tiling: Side by side.
4_.
Selections → Load/Save Selection → Load Selection From Alpha Channel → Selection #3.
Layers → New Raster Layer.
Com a ferramenta Flood Fill (Opacity: 60%), pinte com a cor mais escura (Foreground).
Selections → Select None.
Effects → User Defined Filter → Emboss_3.
5_.
Ative a Raster 2.
Layers → Arrange → Bring to Top.
6_.
Selections → Load/Save Selection → Load Selection From Alpha Channel → Selection #4.
Layers → New Raster Layer.
Com a ferramenta Flood Fill (Opacity: 100%), pinte com o mesmo gradiente do item 1, alterando: Repeats: 1 — Invert desmarcado.
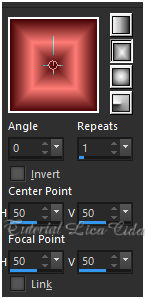
Selections → Select None.
Plugin dsb flux → Linear Transmission.
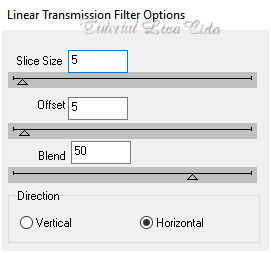
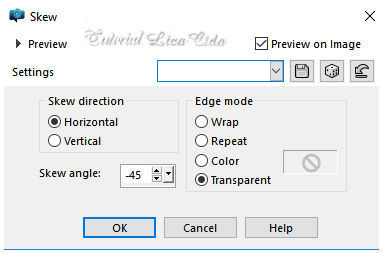
Effects → Geometric Effects → Skew.
Layers → Duplicate.
Image → Mirror → Mirror Vertical.
Image → Mirror → Mirror Horizontal.
Layers → Merge → Merge Down.
Effects → Distortion Effects → Pinch — Strength: 100%.
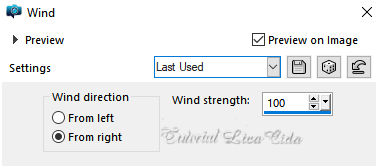
Effects → Distortion Effects → Wind.
Effects → 3D Effects → Drop Shadow: 10 / 10 / 50 / 5,00 — Color: #000000.
Effects → User Defined Filter → Emboss_3.
LAYERS
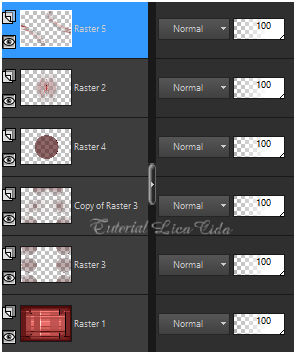
7_.
Layers → New Raster Layer.
Layers → Arrange → Send to Bottom.
Selections → Select All.
Edit → Copy no back finallc
Edit → Paste Into Selection.
Selections → Select None.
8_.
Ative a Raster 3.
Edit → Copy no deco1lc
Edit → Paste As New Layer.
Com a ferramenta Pick Tool, puxe as laterais e acerte.
Plugin Carolaine and Sensibility → CS-Texture: Default (52 / 0 / 175 / 10).
9_.
Ative a Raster 2.
Edit → Copy no deco2lc
Edit → Paste As New Layer.
Com a ferramenta Pick Tool, puxe as laterais e acerte.
Plugin Carolaine and Sensibility → CS-Texture: Default (52 / 0 / 175 / 10).
10_.
Ative a Raster 1.
Plugin Nik Software → Color Efex Pro 3.0 → Bi-Color Filters — Color Set: Cool/Warm 2.
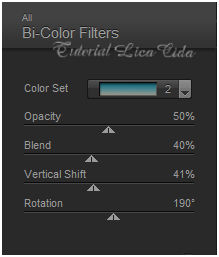
LAYERS
Altere os Blend Modes e a Opacity das layers.
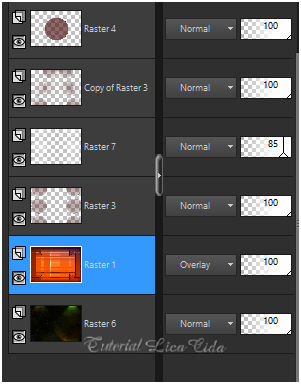
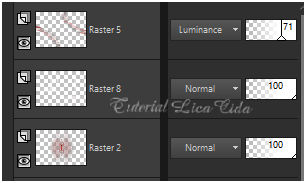
Layers → Merge → Merge Visible.
11_.
Repita: Selections → Load/Save Selection → Load Selection From Alpha Channel → Selection #2.
Layers → New Raster Layer.
Com a ferramenta Flood Fill (Opacity: 100%), pinte com a cor mais escura (Foreground).
Selections → Modify → Contract: 1 px.
Pressione a tecla Delete.
Selections → Modify → Contract: 10 px.
Com a ferramenta Flood Fill (Opacity: 100%), pinte com o gradiente formado no item 6.
Plugin Mehdi → Sorting Tiles.
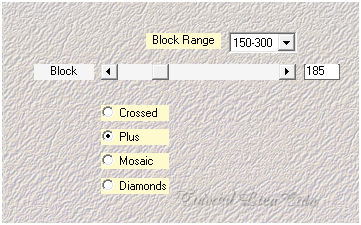
Effects → Edge Effects → Enhance.
Plugin Alien Skin Eye Candy 5: Impact → Glass — Settings: katrina (ou a gosto).
Selections → Select None.
Image → Resize: 25% — Resize all layers desmarcado.
Effects → Image Effects → Offset: H: 504 / V: 0 — Custom e Transparent marcados.
Plugin MuRa's Meister → Copies — Line.
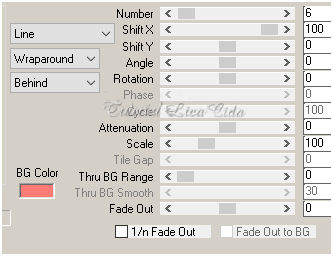
12_.
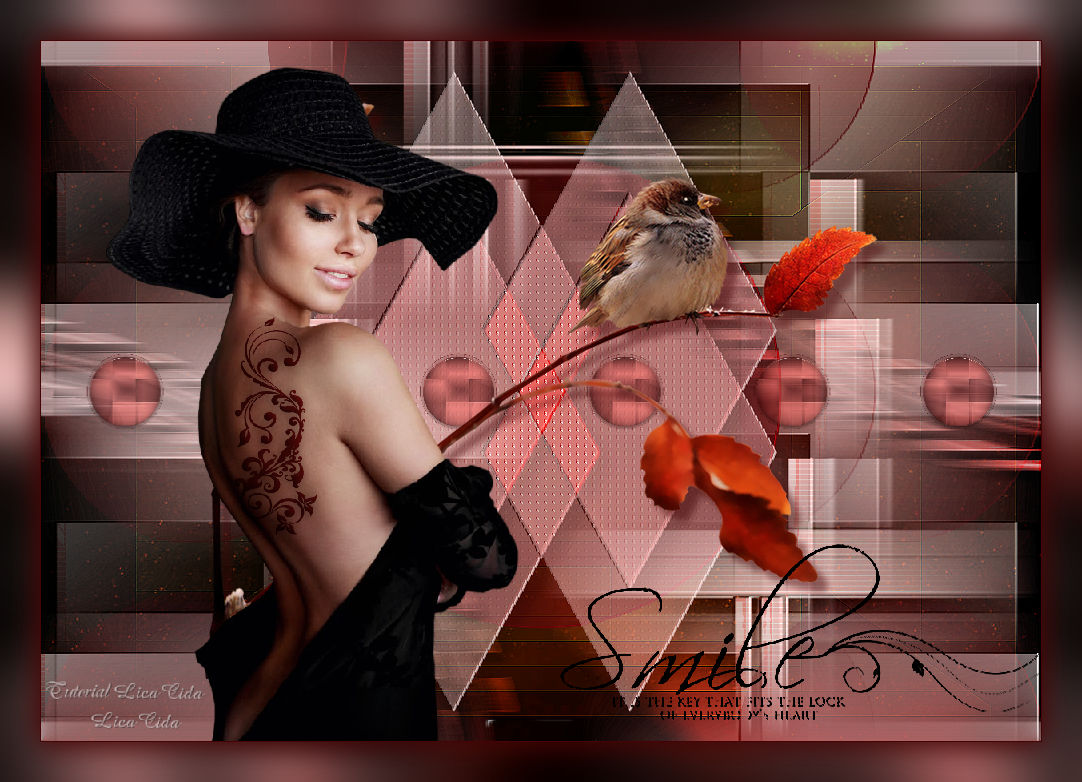
Edit → Copy no tube Automne_oiseau_sur_branche_CibiBijoux
Edit → Paste As New Layer.
13_.
Edit → Copy no tube Gabry-women 190-17
Edit → Paste As New Layer.
Posicione.
14_.
Edit → Copy no word art 004_yoursmile
Edit → Paste As New Layer.
Posicione.
15_.
Ative a layer Merged.
Adjust → One Step Photo Fix (opcional).
Image → Add Borders: 1 px, Symmetric marcado — Color: #440405 (cor mais escura, Foreground).
Aplique a marca-d'água.
Assine e salve.
Espero que gostem.
Aparecida / LicaCida, novembro de 2017.
Rio de Janeiro - Brasil.

VOLTAR
Copyright ©2026 - Web Design - Naise Minas
|


