|
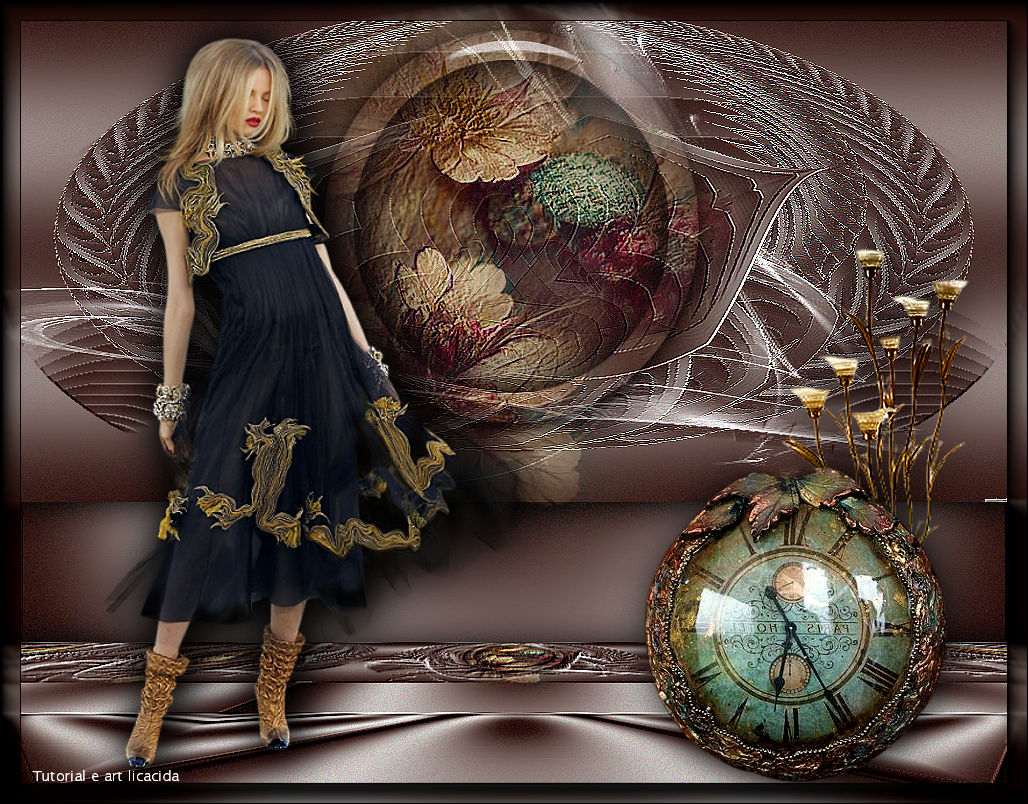
Time Is It
TRADUÇÕES

MATERIAL

Seleção: sel_circulo_lc --
Salvar na pasta Selections do PSP.
Imagens (gradientes): gradiente1-lc
gradiente2-lc
Tubes: Grisi_Woman_768
172FlorByPqnaAlice
Decor: Callitubes-289decor
Callitubes-301decor
Elemento: elementomask narah
Marca-d'água.
Efeitos do PSP.
PLUGINS
Plugin Flaming Pear → Flexify 2
Plugin Alien Skin Eye Candy 5: Impact → Glass
Plugin Alien Skin Eye Candy 5: Impact → Perspective Shadow
Plugin AAA Frames → Foto Frame
Plugin AAA Filters → Custom
Plugin MuRa's Meister → Perspective Tiling
TUTORIAL
|
Esta seta marca sua linha
Clique e arraste para movê-la
|
|
1_.
Abra o material no PSP, duplique e feche os originais.
Escolha duas cores para trabalhar: Foreground: #34201c — Background: #dad9d6.
2_.
Abra uma nova imagem transparente de 1024 x 500 px.
3_.
Selections → Select All.
Edit → Copy no gradiente1-lc
Edit → Paste Into Selection.
Selections → Select None.
4_.
Effects → Image Effects → Seamless Tiling: Default.
5_.
Adjust → Blur → Gaussian Blur — Radius: 52,00.
6_.
Effects → Reflection Effects → Feedback: 100 / 100 / 100 / 100 — Elliptical marcado.
Layers → Duplicate.
Image → Mirror → Mirror Horizontal.
Image → Mirror → Mirror Vertical.
Blend Mode: Darken.
Layers → Merge → Merge Down.
Effects → User Defined Filter → Emboss_3.
7_.
Effects → Reflection Effects → Rotating Mirror: Default.
8_.
Layers → Duplicate.
Effects → Geometric Effects → Pentagon — Transparent.
9_.
Effects → Geometric Effects → Circle — Transparent.
10_.
Plugin Flaming Pear → Flexify 2.
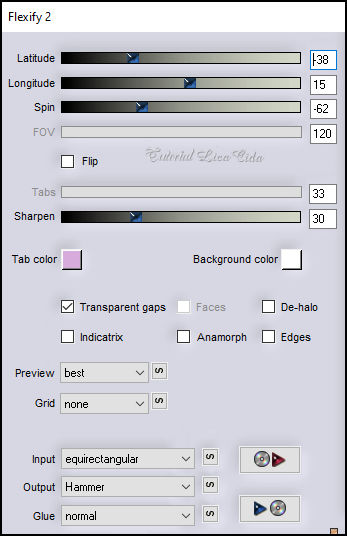
11_.
Layers → Duplicate.
Image → Mirror → Mirror Horizontal.
Blend Mode: Darken.
Effects → User Defined Filter → Emboss_3.
Layers → Merge → Merge Down.
Effects → Edge Effects → Enhance.
Layers → Duplicate.
12_.
Effects → Reflection Effects → Feedback: 100 / 100 / 100 / 100 — Elliptical desmarcado.
13_.
Effects → Distortion Effects → Polar Coordinates — Rectangular to polar — Transparent marcado.
Layers → Arrange → Move Down.
14_.
Layers → Duplicate.
Image → Mirror → Mirror Horizontal.
Layers → Merge → Merge Down.
Effects → Edge Effects → Enhance.
15_.
Selections → Load/Save Selection → Load Selection From Disk → sel_circulo_lc.
Ative a Raster 1.
Selections → Promote Selection to Layer.
Layers → Arrange → Bring to Top.
16_.
Adjust → Blur → Gaussian Blur — Radius: 52,00.
17_.
Edit → Copy no tube 172FlorByPqnaAlice
Edit → Paste As New Layer.
Posicione o seu tube floral ou paisagem (aqui não mexi).
Effects → User Defined Filter → Emboss_3.
Layers → Merge → Merge Down.
Plugin Alien Skin Eye Candy 5: Impact → Perspective Shadow: use a gosto.
18_.
Plugin Alien Skin Eye Candy 5: Impact → Glass — Clear (use a gosto).
19_.
Selections → Modify → Contract: 30 px.
20_.
Layers → New Raster Layer.
Effects → 3D Effects → Cutout.
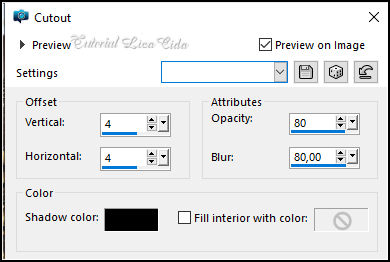
21_.
Layers → New Raster Layer.
Effects → 3D Effects → Cutout (valores negativos).
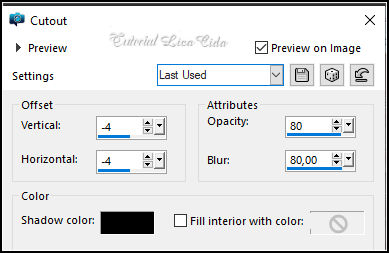
Layers → Merge → Merge Down (aplique duas vezes).
Selections → Select None.
22_.
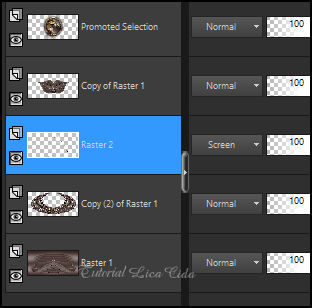
Ative a Copy (2) of Raster 1.
Edit → Copy no elemento elementomask narah
Edit → Paste As New Layer.
Blend Mode: Screen (opcional).
LAYERS
23_.
Image → Canvas Size: 1024 x 700 — Bottom: 200.
24_.
Layers → New Raster Layer.
Layers → Arrange → Send to Bottom.
25_.
Selections → Select All.
Edit → Copy no gradiente2-lc
Edit → Paste Into Selection.
Selections → Select None.
26_.
Adjust → Blur → Gaussian Blur — Radius: 52,00.
27_.
Plugin AAA Frames → Foto Frame — Width: 20, demais valores Default.
Layers → Duplicate.
28_.
Image → Canvas Size: 1024 x 800 — Bottom: 100.
29_.
Plugin AAA Frames → Foto Frame — Width: 40, demais valores Default.
30_.
Plugin MuRa's Meister → Perspective Tiling — Height: 20, demais valores Default.
31_.
Edit → Copy Special → Copy Merged.
Edit → Paste As New Layer.
32_.
Plugin MuRa's Meister → Perspective Tiling — Height: 20, demais valores Default.
Effects → User Defined Filter → Emboss_3.
Plugin Alien Skin Eye Candy 5: Impact → Perspective Shadow: use a gosto.
Ative a Raster 1 e aplique Edit → Repeat (Perspective Shadow).
Image → Add Borders: 2 px, Symmetric marcado — Color: #34201c (Foreground).
Plugin AAA Filters → Custom — Grain e Sharp.
33_.
Plugin AAA Frames → Foto Frame — Width: 20, demais valores Default.
34_.
Edit → Copy no tube Grisi_Woman_768
Edit → Paste As New Layer.
Posicionamento, Resize e Drop Shadow a gosto.
35_.
Edit → Copy no Callitubes-289decor
Edit → Paste As New Layer.
Posicionamento, Resize e Drop Shadow a gosto.
36_.
Edit → Copy no Callitubes-301decor
Edit → Paste As New Layer.
Posicionamento, Resize e Drop Shadow a gosto.
Aplique a marca-d'água.
Assine e salve.
Image → Resize: Width 1024 px.
Espero que apreciem.
Aparecida / LicaCida, maio de 2023.
Rio de Janeiro - Brasil.

VOLTAR
Copyright ©2026 - Web Design - Naise Minas
|


