|
Narah
TRADUÇÕES

MATERIAL

Seleção: 016 1lcsel --
Salvar na pasta Selections do PSP.
Tubes: Narah_0492_Mujer_Oct2009
fractal_5_tubed_by_thafs
Marca-d'água.
Efeitos do PSP.
Versão usada: PSP X8.
PLUGINS
Plugin Toadies → What Are You?
Plugin Visual Manipulation → Transmission
Plugin Alien Skin Eye Candy 5: Impact → Perspective Shadow
Plugin MuRa's Meister → Perspective Tiling
TUTORIAL
|
Esta seta marca sua linha
Clique e arraste para movê-la
|
|
1_.
Abra uma nova imagem transparente de 950 x 650 px.
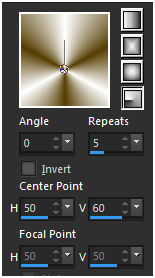
Pinte com o gradiente formado pelas cores #ffffff e #553d00.
Configure: Style: Radial — Angle: 0 — Repeats: 5 — Invert desmarcado — Center Point: H: 50 / V: 60.
Layers → Duplicate.
Image → Flip.
Blend Mode: Multiply.
Layers → Merge → Merge Down.
2_.
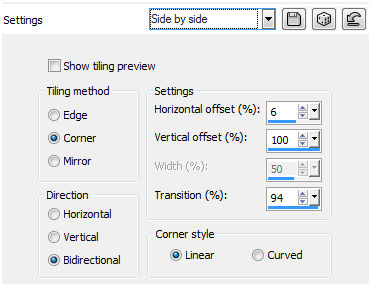
Effects → Image Effects → Seamless Tiling — Side by side.
3_.
Selections → Load/Save Selection → Load Selection From Disk → 016 1lcsel.
Layers → New Raster Layer.
Pinte com o gradiente formado no item 1.
Selections → Select None.
4_.
Effects → Image Effects → Offset: H: 71 / V: 0 — Custom e Transparent marcados.
5_.
Plugin Toadies → What Are You?: 20 / 20.
6_.
Plugin Visual Manipulation → Transmission: 4 / 58 / 78.
7_.
Plugin Alien Skin Eye Candy 5: Impact → Perspective Shadow — Preset: Blurry.
Layers → Duplicate.
Image → Mirror.
Layers → Merge → Merge Down.
8_.
Effects → Reflection Effects → Rotating Mirror: Horizontal Offset: 0 / Rotation Angle: 180 — Reflect.
9_.
Effects → Image Effects → Offset: H: 0 / V: 29 — Custom e Transparent marcados.
10_.
Duplique a Raster 1.
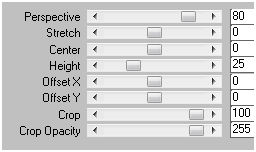
Plugin MuRa's Meister → Perspective Tiling.
11_.
Ative novamente a Raster 1.
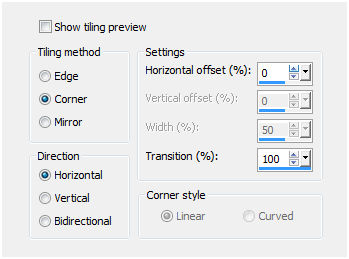
Effects → Image Effects → Seamless Tiling.
12_.
Ative a Raster 2.
Edit → Copy no tube fractal_5_tubed_by_thafs
Edit → Paste As New Layer.
Image → Mirror.
13_.
Effects → Image Effects → Offset: H: 214 / V: 39 — Custom e Transparent marcados.
Opacity: 88%.
Layers → Duplicate.
14_.
Effects → Image Effects → Offset: H: -762 / V: 39 — Custom e Transparent marcados.
15_.
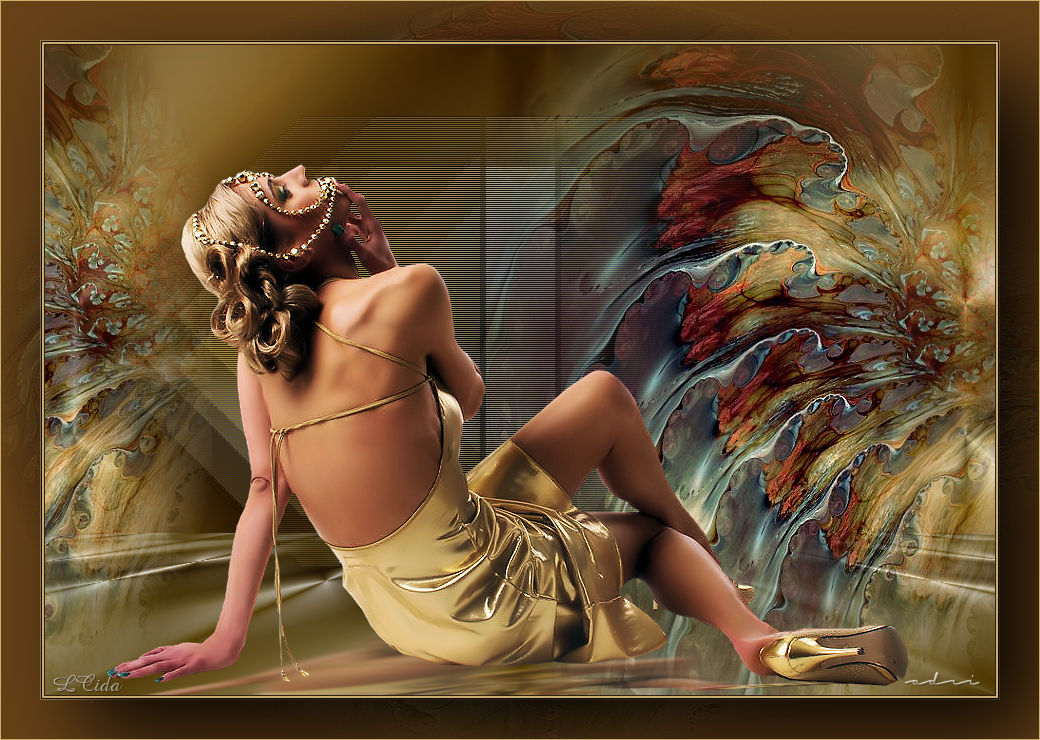
Edit → Copy no tube Narah_0492_Mujer_Oct2009
Edit → Paste As New Layer.
Posicione.
16_.
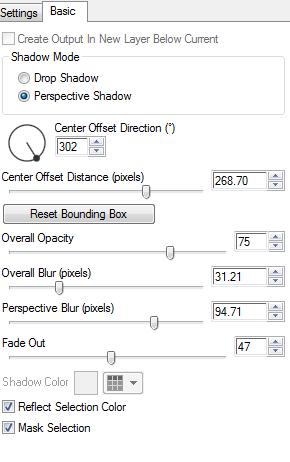
Plugin Alien Skin Eye Candy 5: Impact → Perspective Shadow — Preset: Reflect Behind.
17_.
Image → Add Borders: 1 px, Symmetric marcado — Color: #27140c.
Image → Add Borders: 1 px, Symmetric marcado — Color: #c9ab6d.
Image → Add Borders: 1 px, Symmetric marcado — Color: #27140c.
Image → Add Borders: 40 px, Symmetric marcado — Color: #c9ab6d.
Com a ferramenta Magic Wand, selecione essa borda.
Edit → Copy no tube fractal_5_tubed_by_thafs
Edit → Paste Into Selection.
Selections → Promote Selection to Layer.
Blend Mode: Multiply.
Effects → Edge Effects → Enhance More.
Layers → Merge → Merge Down.
Selections → Invert.
Plugin Alien Skin Eye Candy 5: Impact → Perspective Shadow — Preset: Blurry.
Selections → Select None.
18_.
Image → Add Borders: 1 px, Symmetric marcado — Color: #27140c.
Image → Add Borders: 1 px, Symmetric marcado — Color: #c9ab6d.
Image → Add Borders: 1 px, Symmetric marcado — Color: #27140c.
Adjust → Sharpness → Sharpen.
Aplique a marca-d'água.
Assine e salve.
Esperamos que gostem.
Tutorial criado por Aparecida / LicaCida e Adri, janeiro de 2016.
Rio de Janeiro - Brasil.


VOLTAR
Copyright ©2026 - Web Design - Naise Minas
|

