|
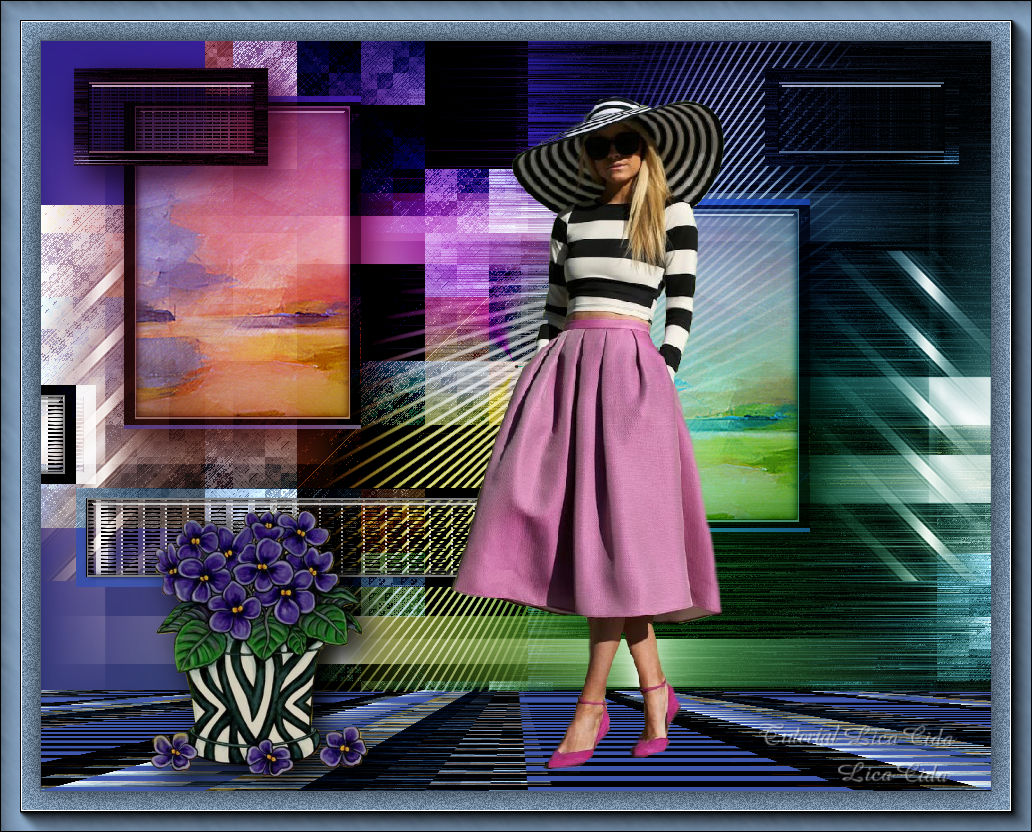
Sophie
TRADUÇÕES

MATERIAL

Seleções: alphachannel — Selection #1, #2, #3 e #4
(guardadas no canal alfa da imagem).
Tubes: naisemulheres150
12_abstrait_animabelle
GG09~AfricanViolets_001
Decos: deco1lc
deco2lc
deco3lc
Marca-d'água.
Efeitos do PSP.
Versão usada: PSP X8.
PLUGINS
Plugin Filters Unlimited 2.0 → &<Bkg Designer sf10 I> → Bee Morph
Plugin Alien Skin Eye Candy 5: Impact → Glass
Plugin Alien Skin Eye Candy 5: Impact → Perspective Shadow
Plugin UnPlugged Effects → Disco Lights
Plugin dsb flux → Bright Noise
Plugin dsb flux → Blast
Plugin FFG → "A" → Weave
Plugin MuRa's Meister → Perspective Tiling
Plugin FM Tile Tools → Blend Emboss
Plugin AAA Frames
TUTORIAL
|
Esta seta marca sua linha
Clique e arraste para movê-la
|
|
1_.
Abra o arquivo alphachannel, duplique (Shift + D) e feche a original.
Pinte com uma cor clara retirada do misted (#819bb6).
Selections → Select All.
Edit → Copy no tube 12_abstrait_animabelle
Edit → Paste Into Selection.
Selections → Select None.
Effects → Image Effects → Seamless Tiling — Default — Transition: 100.
Adjust → Blur → Gaussian Blur — Radius: 28,00.
2_.
Layers → New Raster Layer.
Pinte com uma cor mais escura (#4e5d70).
Effects → Artistic Effects → Chrome.
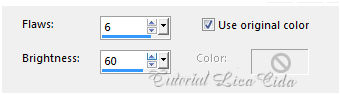
Blend Mode: Overlay — Opacity: 73%.
Layers → Merge → Merge Down.
Adjust → Add/Remove Noise → JPEG Artifact Removal: Maximum — Compression: 78.
Plugin FM Tile Tools → Blend Emboss.
3_.
Plugin Filters Unlimited 2.0 → &<Bkg Designer sf10 I> → Bee Morph.
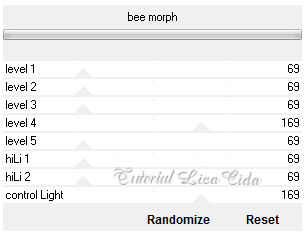
Layers → Duplicate.
4_.
Plugin UnPlugged Effects → Disco Lights — Default (0 / 128 / 0).
Blend Mode: Soft Light.
5_.
Ative a Raster 1.
Selections → Load/Save Selection → Load Selection From Alpha Channel → Selection #1.
Selections → Promote Selection to Layer.
Selections → Select None.
6_.
Plugin dsb flux → Bright Noise.
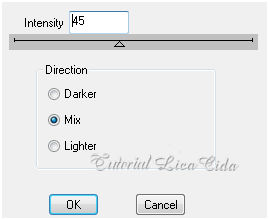
7_.
Plugin dsb flux → Blast. Use as duas opções.
Opção 1:
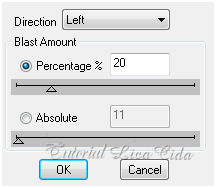
Opção 2:
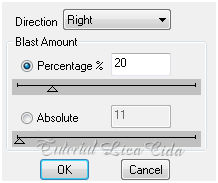
8_.
Ative a Raster 1.
Plugin FFG → "A" → Weave.
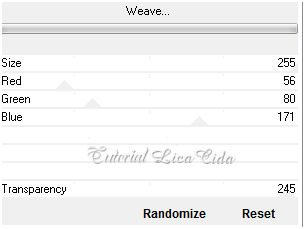
9_.
Volte à layer superior (Promoted Selection).
Selections → Load/Save Selection → Load Selection From Alpha Channel → Selection #2.
Selections → Promote Selection to Layer.
10_.
Selections → Modify → Contract: 25 px.
Effects → Reflection Effects → Pattern.
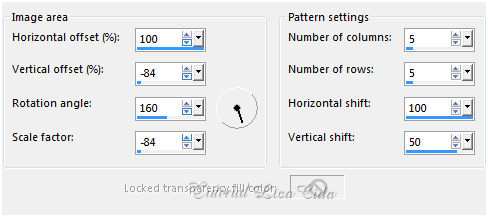
Plugin Alien Skin Eye Candy 5: Impact → Glass (use a gosto).
11_.
Effects → 3D Effects → Chisel — Color: #ffffff.
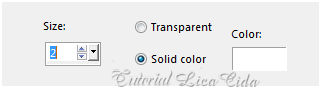
Selections → Select None.
Image → Resize: 60% — Resize all layers desmarcado.
Effects → Image Effects → Offset: H: -449 / V: 103 — Custom e Transparent marcados.
Effects → Reflection Effects → Rotating Mirror: Horizontal Offset: 0 — Rotation Angle: 180 — Repeat.
Plugin Alien Skin Eye Candy 5: Impact → Perspective Shadow — Blurry.
12_.
Ative a Raster 1.
Selections → Load/Save Selection → Load Selection From Alpha Channel → Selection #3.
Selections → Promote Selection to Layer.
Layers → Arrange → Move Up.
13_.
Selections → Modify → Contract: 12 px.
Effects → Reflection Effects → Pattern (veja o print do item 10).
14_.
Edit → Copy no tube 12_abstrait_animabelle
Edit → Paste As New Layer.
Posicione a gosto.
Selections → Invert.
Delete.
Selections → Invert.
Adjust → Sharpness → Sharpen More.
Layers → Merge → Merge Down.
Plugin Alien Skin Eye Candy 5: Impact → Glass (use a gosto).
15_.
Effects → 3D Effects → Chisel (print do item 11).
Selections → Select None.
Layers → Duplicate.
Repita: Effects → Image Effects → Offset: H: -449 / V: 103 — Custom e Transparent marcados.
Layers → Merge → Merge Down.
Plugin Alien Skin Eye Candy 5: Impact → Perspective Shadow — Blurry.
16_.
Ative novamente a Raster 1.
Selections → Load/Save Selection → Load Selection From Alpha Channel → Selection #4.
Selections → Promote Selection to Layer.
17_.
Selections → Modify → Contract: 12 px.
Effects → Reflection Effects → Pattern (veja o print do item 10).
Plugin Alien Skin Eye Candy 5: Impact → Glass (use a gosto).
18_.
Effects → 3D Effects → Chisel (print do item 11).
Selections → Select None.
Effects → 3D Effects → Drop Shadow: 0 / 20 / 80 / 0 — Color: #ffffff.
Layers → Arrange → Bring to Top.
Layers → Duplicate.
Repita: Effects → Image Effects → Offset: H: -449 / V: 103 — Custom e Transparent marcados.
Layers → Merge → Merge Down.
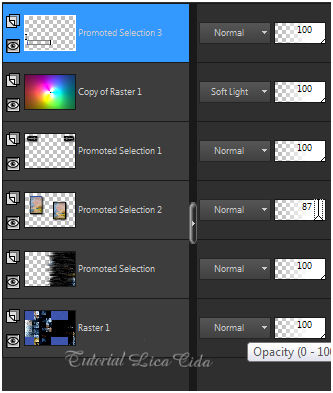
Altere os Blend Modes e a Opacity das layers.
19_.
Ative a Raster 1 e copie essa layer (Edit → Copy).
Image → Canvas Size: 950 x 750.
Selecione.
Layers → New Raster Layer.
Edit → Paste Into Selection.
Selections → Select None.
20_.
Plugin MuRa's Meister → Perspective Tiling — Default.
Com a ferramenta Pick Tool, desça o efeito até a base do top.
21_.
Ative a layer Promoted Selection.
Edit → Copy nos decos deco1lc, deco2lc e deco3lc
Edit → Paste As New Layer (cada um).
No deco2lc: Effects → Image Effects → Offset: H: 71 / V: 49 — Custom e Transparent marcados.
22_.
Ative a layer superior.
Edit → Copy nos tubes naisemulheres150 e GG09~AfricanViolets_001
Edit → Paste As New Layer (cada um).
Use a gosto.
23_.
Image → Add Borders: 1 px, Symmetric marcado — Color: #4e5d70 (cor mais escura).
Image → Add Borders: 40 px, Symmetric marcado — Color: #819bb6 (cor mais clara).
Selecione a borda.
24_.
Plugin dsb flux → Bright Noise (print do item 6).
Selections → Invert.
Effects → 3D Effects → Drop Shadow: 0 / 0 / 80 / 40,00 — Color: #000000.
Selections → Select None.
25_.
Plugin AAA Frames.
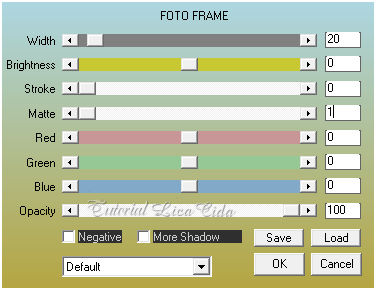
Aplique a marca-d'água.
Assine e salve.
Espero que gostem.
Aparecida / LicaCida, abril de 2017.
Rio de Janeiro - Brasil.

VOLTAR
Copyright ©2026 - Web Design - Naise Minas
|

