|
Someone TRADUÇÕES
MATERIAL
Seleções: Selection #1 e #2 --
Preset: Illumination → Lights → Preset_Lights_Where --
Back: backazul
Tubes: Callitubes-2808mulheres
Mask: LF-Mask-62
Marca-d'água.
PLUGINS
Plugin MuRa's Seamless → Emboss at Alpha
TUTORIAL
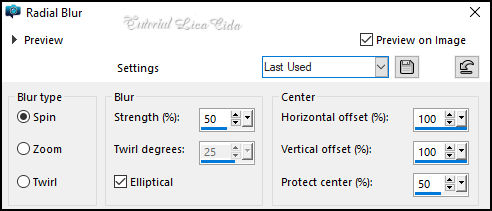
Configure: Foreground: #c9772f — Background: #fdfbfc. 1_. Abra o arquivo alphachannelsomeone. Selections → Select All. Edit → Copy no backazul Edit → Paste Into Selection. Selections → Select None. Renomeie a layer como Raster 1. 2_. Layers → New Raster Layer. Selections → Select All. Edit → Copy no tube Callitubes-2808mulheres Edit → Paste Into Selection. Selections → Select None. Renomeie a layer como Raster 2. 3_. Adjust → Blur → Radial Blur.
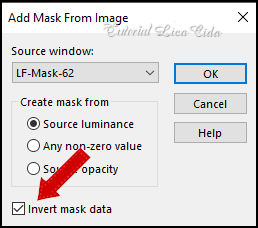
4_. Layers → New Raster Layer. Com a ferramenta Flood Fill (Opacity: 40%), pinte com a cor #fdfbfc (Background). Renomeie a layer como Raster 3. 5_. Layers → New Mask Layer → From Image: LF-Mask-62 — Invert mask data marcado.
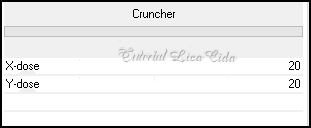
Effects → Edge Effects → Enhance. Layers → Merge → Merge Group. Plugin MuRa's Seamless → Emboss at Alpha — Default. Volte a Opacity do Flood Fill para 100%. 6_. Ative a Raster 1. Selections → Load/Save Selection → Load Selection From Alpha Channel → Selection #1. Selections → Promote Selection to Layer. Layers → Arrange → Bring to Top. Selections → Select None. 7_. Plugin Filters Unlimited 2 → &<Bkg Designer sf10 I> → Cruncher: 20 / 20.
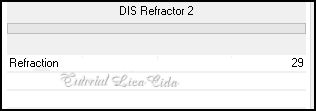
8_. Plugin Filters Unlimited 2 → &<BKg Designer sf10 II> → DIS Refractor 2: 29.
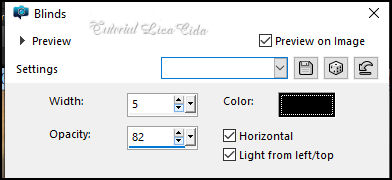
Effects → Edge Effects → Enhance. 9_. Effects → Image Effects → Seamless Tiling — Default — Transition: 100%. Blend Mode: Luminance (L). Layers → Duplicate. Na layer duplicada: 10_. Effects → Texture Effects → Blinds.
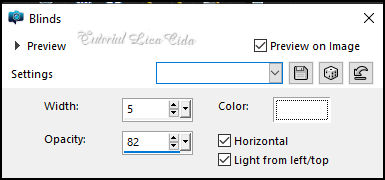
Blend Mode: Multiply. Para acentuar a cor: Layers → Duplicate e Layers → Merge → Merge Down. Layers → Arrange → Move Down (aplique três vezes). 11_. Ative a layer original, do topo. Effects → Texture Effects → Blinds — Color: #ffffff.
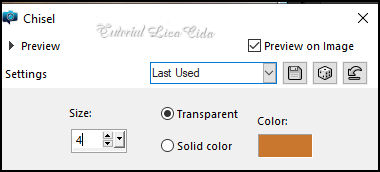
Edit → Repeat: Blinds. 12_. Ative a Raster 2. Selections → Load/Save Selection → Load Selection From Alpha Channel → Selection #2. Retire a visibilidade das layers superiores. 13_. Edit → Copy no 105PaisagemByPqnaAlice (1) Edit → Paste As New Layer. Renomeie a layer como Raster 4. Posicione (redimensione, se for necessário). Effects → User Defined Filter → Emboss_3. Blend Mode: Hard Light. 14_. Layers → New Raster Layer. Renomeie a layer como Raster 5. Effects → 3D Effects → Chisel — Color: #c9772f (Foreground).
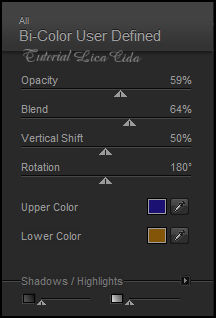
Selections → Select None. Layers → Arrange → Move Up. Plugin Alien Skin Eye Candy 5: Impact → Perspective Shadow — a gosto (reforce). 15_. Ative a Raster 4 e aplique, suavemente: Plugin Alien Skin Eye Candy 5: Impact → Perspective Shadow — a gosto. 16_. Ative a Raster 1. Plugin Nik Software → Color Efex Pro 3.0 → Bi-Color User Defined (aplique duas vezes).
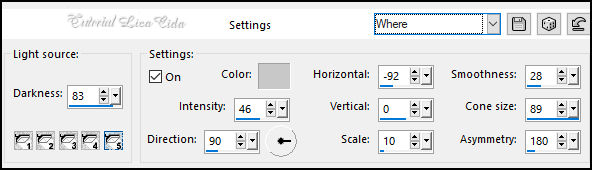
17_. Na mesma layer: Effects → Illumination Effects → Lights → Preset_Lights_Where.
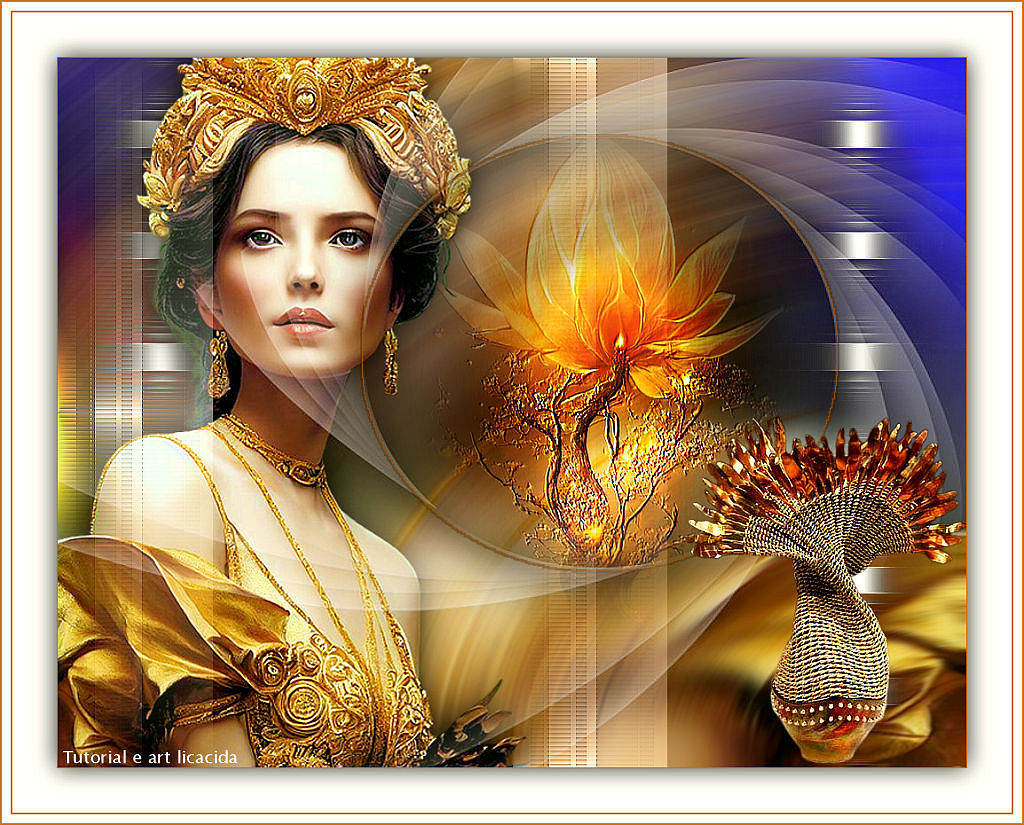
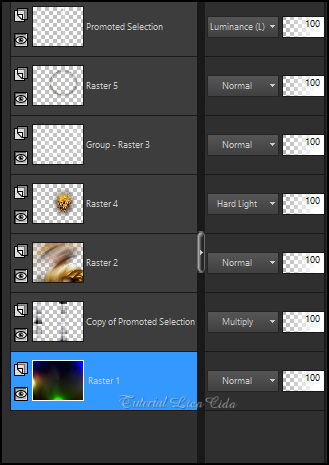
LAYERS Organize as layers como no print.
18_. Ative a Raster 4. Edit → Copy no truoble_arquivo Edit → Paste As New Layer. Com a ferramenta Pick Tool, arraste as laterais. 19_. Edit → Copy no tube Callitubes-2808mulheres Edit → Paste As New Layer. Posicione (redimensione, se for necessário). Plugin Alien Skin Eye Candy 5: Impact → Perspective Shadow — a gosto. Obs.: o tube deverá ficar abaixo da layer da mask. 20_. Ative a layer do topo. Edit → Copy no tube Callitubes-253decor Edit → Paste As New Layer. Posicione (redimensione, se for necessário). Plugin Alien Skin Eye Candy 5: Impact → Perspective Shadow — a gosto. 21_. Image → Add Borders: 1 px, Symmetric marcado — Color: #c9772f (Foreground). Selections → Select All. Image → Add Borders: 50 px, Symmetric marcado — Color: #fdfbfc (Background). Effects → 3D Effects → Drop Shadow: 0 / 0 / 80 / 40,00 — Color: #000000. Selections → Select None. Image → Add Borders: 2 px, Symmetric marcado — Color: #c9772f (Foreground). Image → Add Borders: 10 px, Symmetric marcado — Color: #fdfbfc (Background). Image → Add Borders: 2 px, Symmetric marcado — Color: #c9772f (Foreground). Aplique a marca-d'água. Assine e salve. Image → Resize: Width 1024 px. Espero que apreciem. Obrigada!
Aparecida / LicaCida, fevereiro de 2023.
Copyright ©2026 - Web Design - Naise Minas |