|
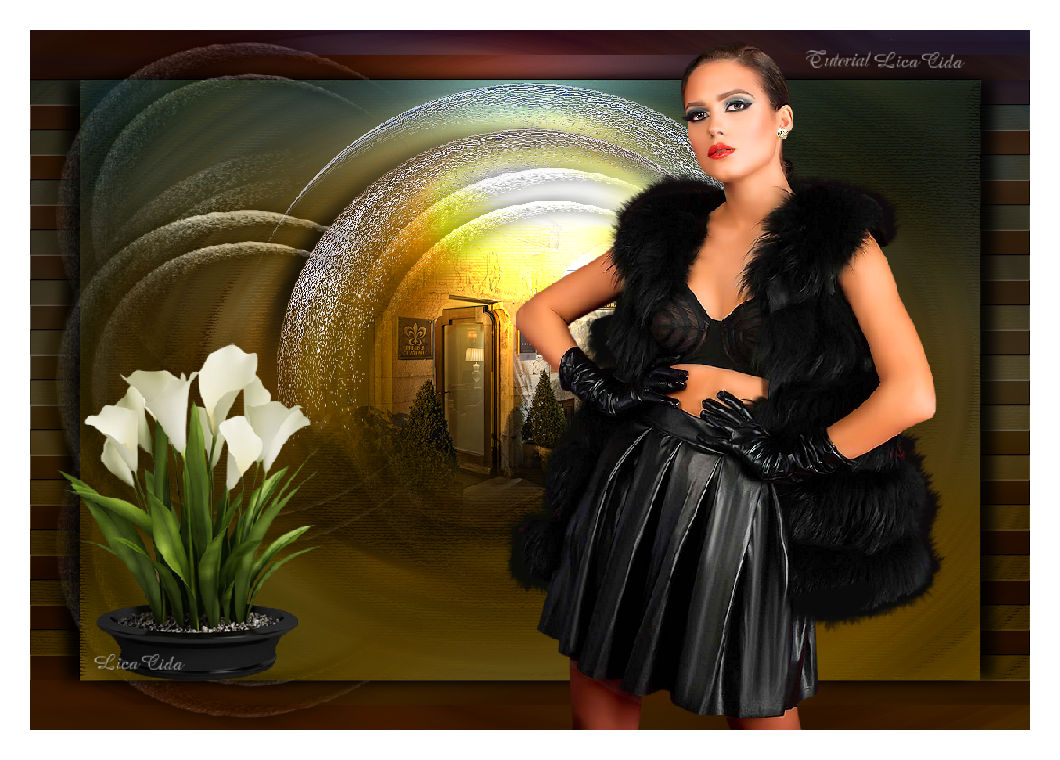
Seleção 3946 Aliciar
TRADUÇÕES

MATERIAL

Seleção: sel3946_aliciar --
Salvar na pasta Selections do PSP.
Preset: Illumination → Lights → Preset_Lights_Lens_of_love (marapontes) --
Salvar na pasta Presets do PSP.
Back: back_sfondolettera-mina@
Decos: decolc1
decolc2
Tubes: Mina@.5079 WOMAN 02.18
Mina@.5080 MIST PAESAGGIO 02.18
Coupe_arums_CibiBijoux
Marca-d'água.
Efeitos do PSP.
Versão usada: PSP X8.
PLUGINS
Plugin Toadies → Blur 'em!
Plugin Flaming Pear → Flexify 2
Plugin Nik Software → Color Efex Pro 3.0 → Bi-Color User Defined
Plugin Nik Software → Color Efex Pro 3.0 → Bi-Color Filters
Plugin Filters Unlimited 2.0 → Buttons & Frames → Mirrored Frame
Plugin dsb flux → Linear Transmission
Plugin MuRa's Seamless → Emboss at Alpha
Plugin Artistiques → Pastels
TUTORIAL
|
Esta seta marca sua linha
Clique e arraste para movê-la
|
|
1_.
Abra o back_sfondolettera-mina@ (faça uma cópia e deixe separada). Vamos trabalhar no back.
Selections → Select All.
Edit → Copy no Mina@.5080 MIST PAESAGGIO 02.18 (Raster 1)
Edit → Paste Into Selection.
Selections → Select None.
2_.
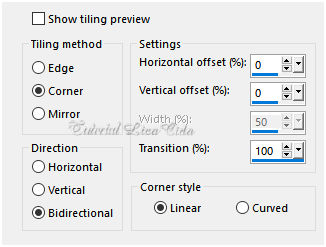
Effects → Image Effects → Seamless Tiling.
3_.
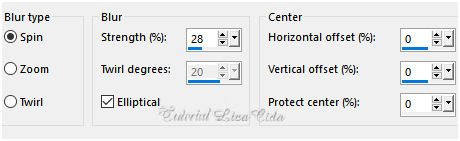
Adjust → Blur → Radial Blur.
4_.
Selections → Load/Save Selection → Load Selection From Disk → sel3946_aliciar.
5_.
Layers → New Raster Layer.
Edit → Copy na cópia do back separada
Edit → Paste Into Selection.
Selections → Select None.
Layers → Duplicate.
Effects → Image Effects → Offset: H: 50 / V: 0 — Custom e Transparent marcados.
Layers → Merge → Merge Down.
Layers → Duplicate.
Effects → Image Effects → Offset: H: -50 / V: 0 — Custom e Transparent marcados.
Layers → Merge → Merge Down.
Pode deletar a cópia separada do back.
6_.
Ative a ferramenta Selection Tool (tecla S) → Custom Selection.
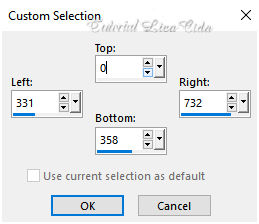
Selections → Invert.
Pressione a tecla Delete.
Selections → Select None.
Plugin Toadies → Blur 'em!: 30 / 215.
7_.
Plugin Flaming Pear → Flexify 2.
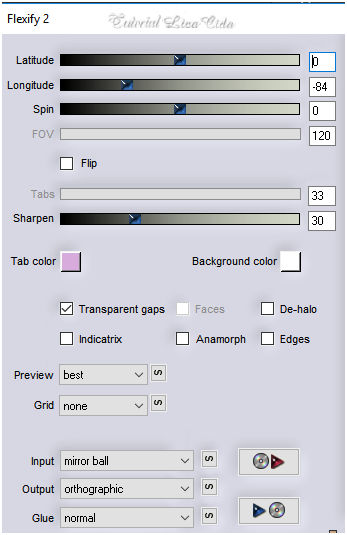
Effects → Edge Effects → Enhance More.
Image → Resize: 85% — Resize all layers desmarcado.
Layers → Duplicate.
Image → Resize: 85% — Resize all layers desmarcado.
Effects → 3D Effects → Drop Shadow: -1 / 15 / 85 / 25,00 — Color: #000000.
8_.
Plugin Nik Software → Color Efex Pro 3.0 → Bi-Color User Defined.
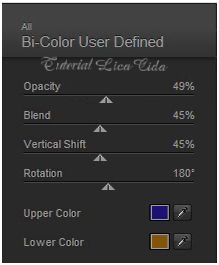
Image → Mirror → Mirror Horizontal.
9_.
Ative a Raster 1.
Plugin Nik Software → Color Efex Pro 3.0 → Bi-Color Filters — Color Set: Cool/Warm 1 — Default.
10_.
Edit → Copy no Mina@.5080 MIST PAESAGGIO 02.18 (Raster 2)
Edit → Paste As New Layer.
LAYERS
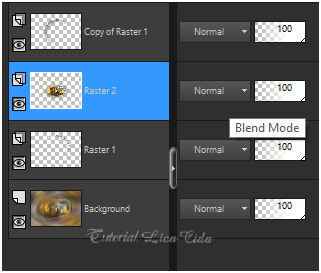
11_.
Na layer do Mina@.5080 MIST PAESAGGIO 02.18 (Raster 2):
Effects → Illumination Effects → Lights → Preset_Lights_Lens_of_love.
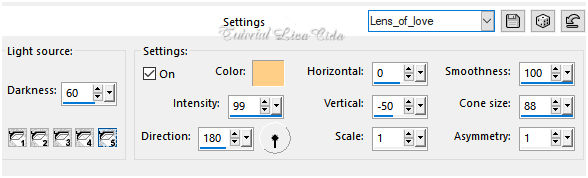
12_.
Edit → Copy no decolc1
Edit → Paste As New Layer.
Repita: Effects → Illumination Effects → Lights → Preset_Lights_Lens_of_love.
Blend Mode: Luminance (L).
13_.
Ative a layer Background.
Plugin Filters Unlimited 2.0 → Buttons & Frames → Mirrored Frame.
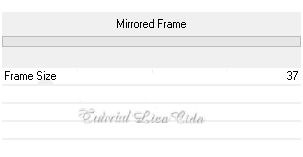
Selections → Select All.
Selections → Modify → Contract: 50 px.
Selections → Invert.
Selections → Promote Selection to Layer.
14_.
Plugin dsb flux → Linear Transmission.
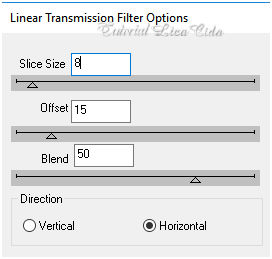
Plugin MuRa's Seamless → Emboss at Alpha: Default.
Repita: Plugin Nik Software → Color Efex Pro 3.0 → Bi-Color User Defined.
Repita: Effects → Illumination Effects → Lights → Preset_Lights_Lens_of_love.
Selections → Invert.
Effects → 3D Effects → Drop Shadow: -1 / 15 / 85 / 25,00 — Color: #000000.
Effects → 3D Effects → Drop Shadow: 1 / -15 / 85 / 25,00 — Color: #000000.
Selections → Select None.
15_.
Ative a layer Background.
Plugin Artistiques → Pastels.
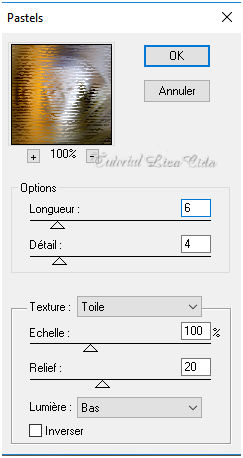
Repita: Plugin Nik Software → Color Efex Pro 3.0 → Bi-Color Filters — Color Set: Cool/Warm 1 — Default.
Repita: Effects → Illumination Effects → Lights → Preset_Lights_Lens_of_love.
16_.
Ative a layer superior (Copy of Raster 1).
Edit → Copy no decolc2
Edit → Paste As New Layer.
Objects → Align → Left.
Blend Mode: Luminance (L).
Repita: Effects → Illumination Effects → Lights → Preset_Lights_Lens_of_love.
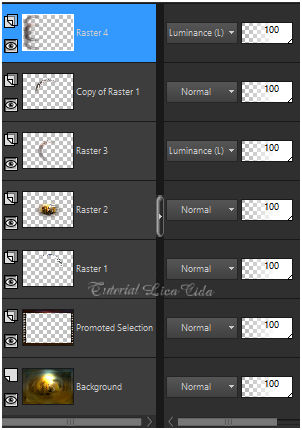
17_.
Edit → Copy nos tubes Mina@.5079 WOMAN 02.18 e Coupe_arums_CibiBijoux
Edit → Paste As New Layer (cada um).
Redimensione e posicione a gosto.
Image → Add Borders: 30 px, Symmetric marcado — Color: #ffffff.
Aplique a marca-d'água.
Assine e salve.
Espero que gostem.
Aparecida / LicaCida, fevereiro de 2018.
Rio de Janeiro - Brasil.

VOLTAR
Copyright ©2026 - Web Design - Naise Minas
|


