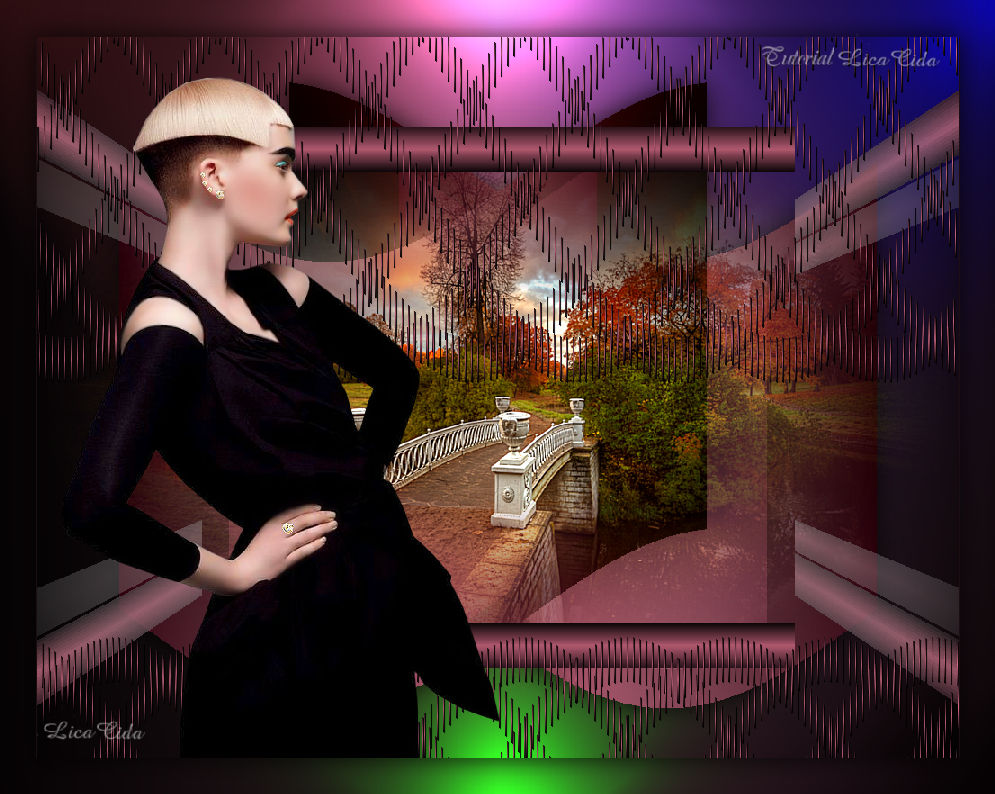
|
Rocio TRADUÇÕES
MATERIAL
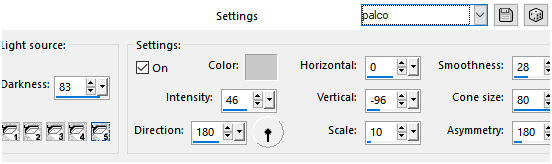
Preset: Illumination → Lights → Preset_Lights_palco --
Tubes: Mina@.4886 woman.9.17
Marca-d'água.
Versão usada: PSP X8.
PLUGINS
Plugin MuRa's Seamless → Shift at Wave
TUTORIAL
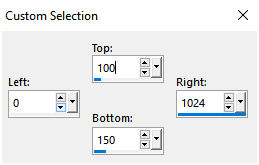
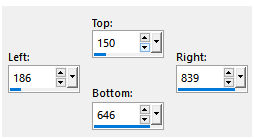
Configure: Foreground: #1c0d12 — Background: #af586e. 1_. Abra uma nova imagem transparente de 1024 x 800 px. Ative a ferramenta Selection Tool (tecla S) → Custom Selection.
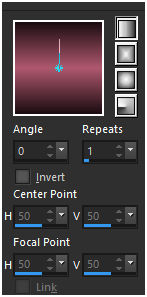
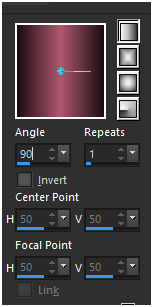
Pinte com o gradiente formado pelas cores selecionadas acima. Configure: Style: Linear — Angle: 0 — Repeats: 1 — Invert desmarcado.
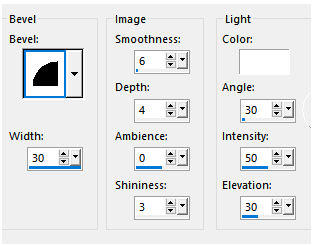
Effects → 3D Effects → Inner Bevel.
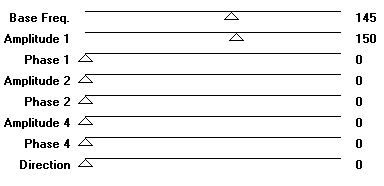
Selections → Select None. 2_. Layers → Duplicate. Plugin MuRa's Seamless → Shift at Wave.
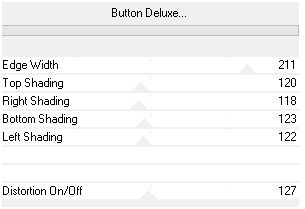
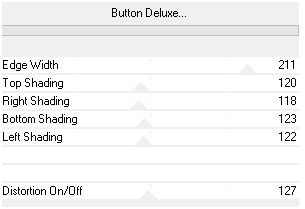
Effects → 3D Effects → Drop Shadow: 1 / 1 / 100 / 1,00 — Color: #000000. 3_. Ative a Raster 1. Plugin FFG → B → Button Deluxe.
Layers → Duplicate. Image → Mirror → Mirror Vertical. Layers → Merge → Merge Down. 4_. Layers → New Raster Layer. Layers → Arrange → Send to Bottom. Pinte com o mesmo gradiente formado acima, mudando para: Style: Linear — Angle: 90.
Com a ferramenta Selection Tool (tecla S), selecione o efeito formado ou use a Custom Selection.
5_. Selections → Promote Selection to Layer. Repita: Plugin FFG → B → Button Deluxe.
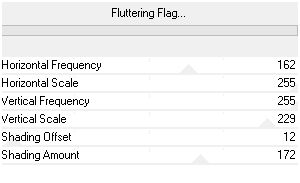
Selections → Select None. Plugin FFG → B → Fluttering Flag.
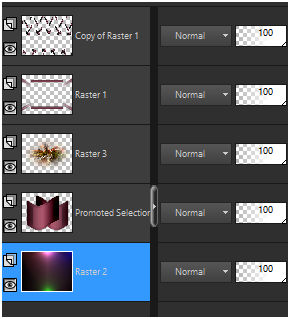
6_. Layers → Duplicate. Image → Mirror → Mirror Horizontal. Layers → Merge → Merge Down. Effects → 3D Effects → Drop Shadow: 0 / 0 / 80 / 40,00 — Color: #000000. 7_. Edit → Copy no _141_paysage_p3_animabelle Edit → Paste As New Layer. Adjust → Sharpness → Sharpen More. 8_. Ative a layer inferior (Raster 2). Effects → Illumination Effects → Lights → Preset_Lights_palco.
Altere os Blend Modes e a Opacity das layers.
9_. Ative a layer superior (Copy of Raster 1). Edit → Copy no tube Mina@.4886 woman.9.17 Edit → Paste As New Layer. Posicione. 10_. Edit → Copy (Raster 2). Image → Add Borders: 1 px, Symmetric marcado — Color: #1c0d12 (Foreground). Image → Add Borders: 40 px, Symmetric marcado — Color: #af586e (Background). Selecione a borda. Edit → Paste Into Selection. Selections → Invert. Effects → 3D Effects → Drop Shadow: 0 / 0 / 80 / 40,00 — Color: #000000. Selections → Select None. Aplique a marca-d'água. Assine e salve. Image → Resize: 90%. Espero que gostem. Obrigada!
Aparecida / LicaCida, outubro de 2017.
Copyright ©2026 - Web Design - Naise Minas |