|
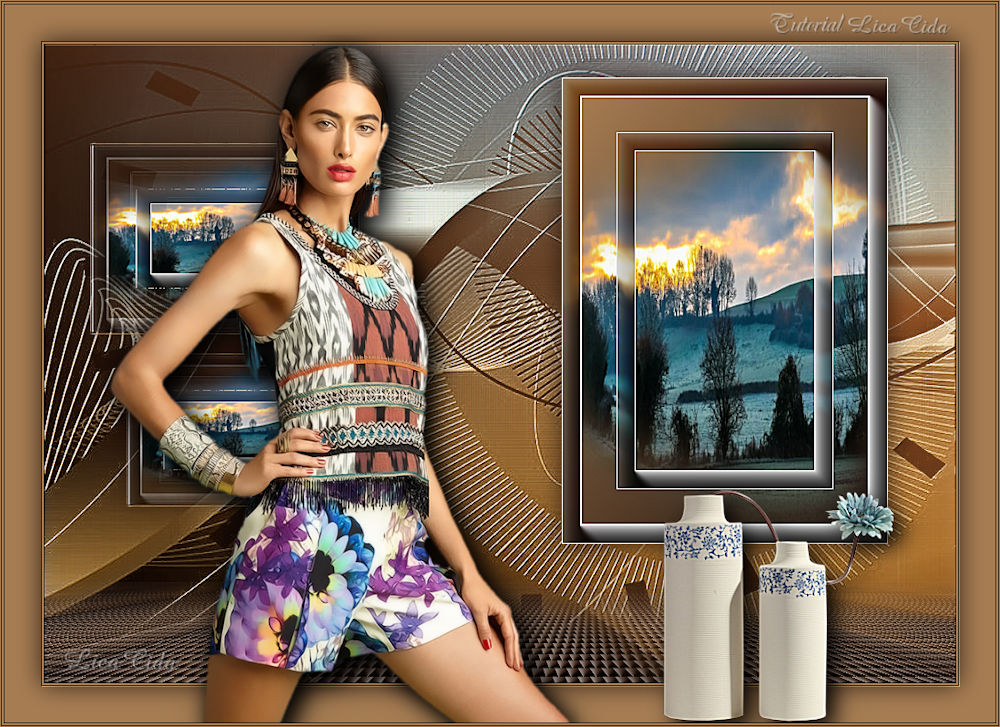
Nature Frame
TRADUÇÕES

MATERIAL

Preset: Preset_UserDefinedFilter_Double_Vision --
Salvar na pasta Presets do PSP.
Masks: Narah_Mask_1487
MASK-MD-065
Tubes: AStube 791
nicole-paysage7-2020
nicole-vase-2020
Back: back-arquivo net
Marca-d'água.
Efeitos do PSP.
Versão usada: PSP X9.
PLUGINS
Plugin Galaxy → Instant Mirror
Plugin MuRa's Seamless → Emboss at Alpha
Plugin Graphics Plus → Vertical Mirror
Plugin Simple → Centre Tile
Plugin AAA Frames → Foto Frame
Plugin VM Natural
Plugin MuRa's Meister → Perspective Tiling
Plugin Nik Software → Color Efex Pro 3.0 → Bi-Color Filters
Plugin VM Toolbox → Brightness Noise
Plugin FM Tile Tools → Blend Emboss
TUTORIAL
|
Esta seta marca sua linha
Clique e arraste para movê-la
|
|
1_.
Abra uma nova imagem transparente de 1000 x 700 px.
Pinte com o gradiente formado pelas cores #190c09 (Foreground) e #ad8255 (Background).
Configure: Style: Linear — Angle: 40 — Repeats: 0 — Invert desmarcado.
Layers → Duplicate.
Retire a visibilidade da Raster 1.
2_.
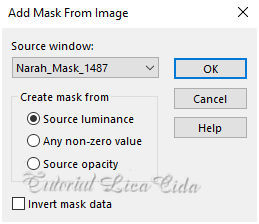
Layers → New Mask Layer → From Image: Narah_Mask_1487.
Effects → Edge Effects → Enhance.
Layers → Merge → Merge Group.
3_.
Plugin Galaxy → Instant Mirror.
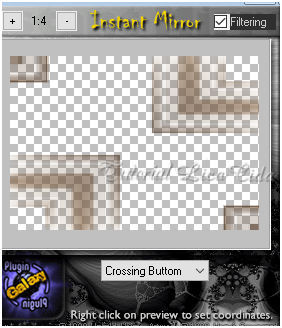
Plugin MuRa's Seamless → Emboss at Alpha → Default.
4_.
Plugin Graphics Plus → Vertical Mirror → Default (128 / 0).
5_.
Plugin Simple → Centre Tile.
Effects → User Defined Filter → Double_Vision.
6_.
Com a ferramenta Selection Tool (Default), selecione o primeiro quadro e copie-o como nova layer.
Selections → Select None.
As layers estão assim:
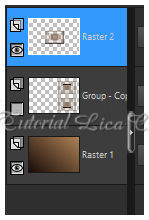
Delete a layer Group - Copy of Raster 1.
Ative a visibilidade da Raster 1.
7_.
Com a ferramenta Magic Wand (Default), selecione a parte externa do quadro (Raster 2).
Selections → Invert.
8_.
Selections → Modify → Contract: 5 px.
9_.
Edit → Copy no tube nicole-paysage7-2020
Edit → Paste Into Selection.
10_.
Plugin AAA Frames → Foto Frame.
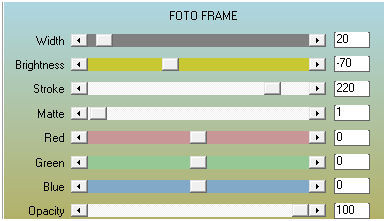
11_.
Selections → Modify → Contract: 60 px.
12_.
Plugin AAA Frames → Foto Frame — modifique Matte: 0.
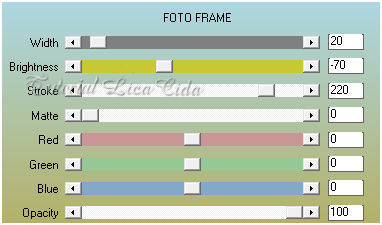
Selections → Select None.
Image → Resize: 80% — Resize all layers desmarcado.
13_.
Effects → Image Effects → Offset.
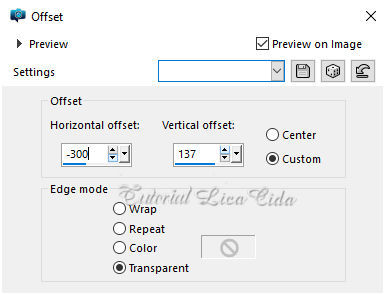
Layers → Duplicate.
Image → Resize: 80% — Resize all layers desmarcado.
14_.
Effects → Image Effects → Offset.
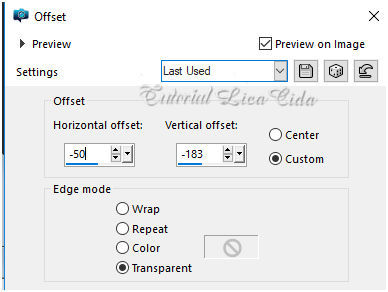
Layers → Merge → Merge Down.
Adjust → Sharpness → Sharpen More.
Effects → 3D Effects → Drop Shadow: 0 / 0 / 60 / 30,00 — Color: #000000.
15_.
Ative a Raster 1.
Layers → Duplicate.
Image → Resize: 80% — Resize all layers desmarcado.
Image → Free Rotate.
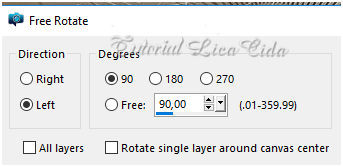
Layers → Duplicate.
Retire a visibilidade da layer duplicada.
16_.
Na layer original (Copy of Raster 1):
Plugin VM Natural: 5 / 180 / 32 / 255 / 255.
Effects → Image Effects → Seamless Tiling.
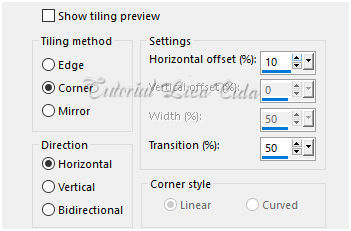
17_.
Plugin MuRa's Meister → Perspective Tiling — Default, com Height: 20 (demais valores iguais).
Effects → Reflection Effects → Rotating Mirror: 0 / 0 — Reflect.
Com a ferramenta Magic Wand — Feather: 60, clique na parte transparente.
Pressione a tecla Delete três ou quatro vezes, para suavizar o efeito.
Selections → Select None.
Plugin MuRa's Seamless → Emboss at Alpha → Default.
18_.
Ative a layer duplicada.
Image → Resize: 80% — Resize all layers desmarcado (duas vezes).
19_.
Selections → Select All.
Selections → Float.
Selections → Defloat.
20_.
Edit → Copy no tube nicole-paysage7-2020
Edit → Paste Into Selection.
21_.
Plugin AAA Frames → Foto Frame, como no item 10.
22_.
Selections → Modify → Contract: 60 px.
23_.
Plugin AAA Frames → Foto Frame — modifique Matte: 0, como no item 12.
Selections → Select None.
24_.
Effects → Image Effects → Offset.
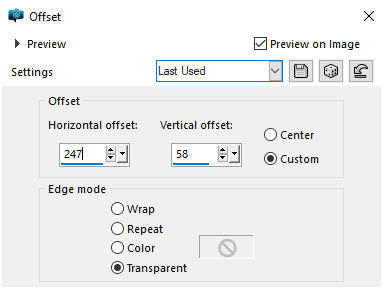
Adjust → Sharpness → Sharpen More.
Effects → 3D Effects → Drop Shadow: 0 / 0 / 60 / 30,00 — Color: #000000.
25_.
Ative a Raster 1.
Layers → New Raster Layer.
Selections → Select All.
Edit → Copy no back-arquivo net
Edit → Paste Into Selection.
Selections → Select None.
26_.
Layers → New Mask Layer → From Image: MASK-MD-065.
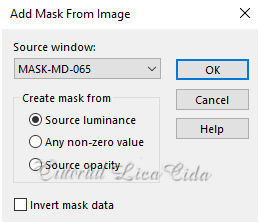
Effects → Edge Effects → Enhance.
Layers → Merge → Merge Group.
Effects → 3D Effects → Drop Shadow: 0 / 0 / 60 / 30,00 — Color: #000000.
Plugin MuRa's Seamless → Emboss at Alpha → Default.
27_.
Plugin Nik Software → Color Efex Pro 3.0 → Bi-Color Filters — Color Set: Cool/Warm 2 — Default (use a gosto).
28_.
Ative a Raster 1.
Layers → Duplicate.
Plugin VM Toolbox → Brightness Noise.
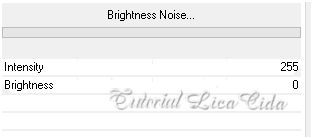
29_.
Plugin FM Tile Tools → Blend Emboss → Default.
Blend Mode: Overlay.
LAYERS
Altere os Blend Modes e a Opacity das layers.
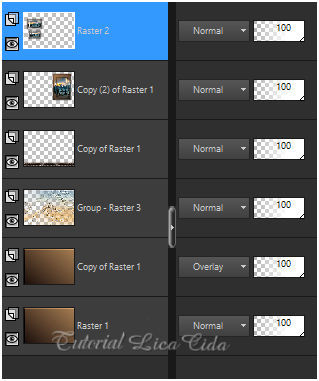
Image → Add Borders: 1 px, Symmetric marcado — Color: escura.
Image → Add Borders: 2 px, Symmetric marcado — Color: clara.
Image → Add Borders: 1 px, Symmetric marcado — Color: escura.
Image → Add Borders: 50 px, Symmetric marcado — Color: clara.
Selecione a borda de 50 px.
Plugin VM Toolbox → Brightness Noise, como no item 28.
Plugin FM Tile Tools → Blend Emboss → Default.
Selections → Invert.
Effects → 3D Effects → Drop Shadow: 0 / 0 / 80 / 40,00 — Color: #000000.
Selections → Select None.
30_.
Edit → Copy no tube AStube 791
Edit → Paste As New Layer.
Adjust → Sharpness → Sharpen.
Posicione.
Opcional: Drop Shadow.
31_.
Edit → Copy no tube nicole-vase-2020
Edit → Paste As New Layer.
Adjust → Sharpness → Sharpen.
Posicione.
Opcional: Drop Shadow.
Image → Add Borders: 1 px, Symmetric marcado — Color: escura.
Image → Add Borders: 2 px, Symmetric marcado — Color: clara.
Image → Add Borders: 1 px, Symmetric marcado — Color: escura.
Image → Resize: Width 1000 px.
Aplique a marca-d'água.
Assine e salve.
Espero que gostem.
Aparecida / LicaCida, março de 2021.
Rio de Janeiro - Brasil.

VOLTAR
Copyright ©2026 - Web Design - Naise Minas
|


