|
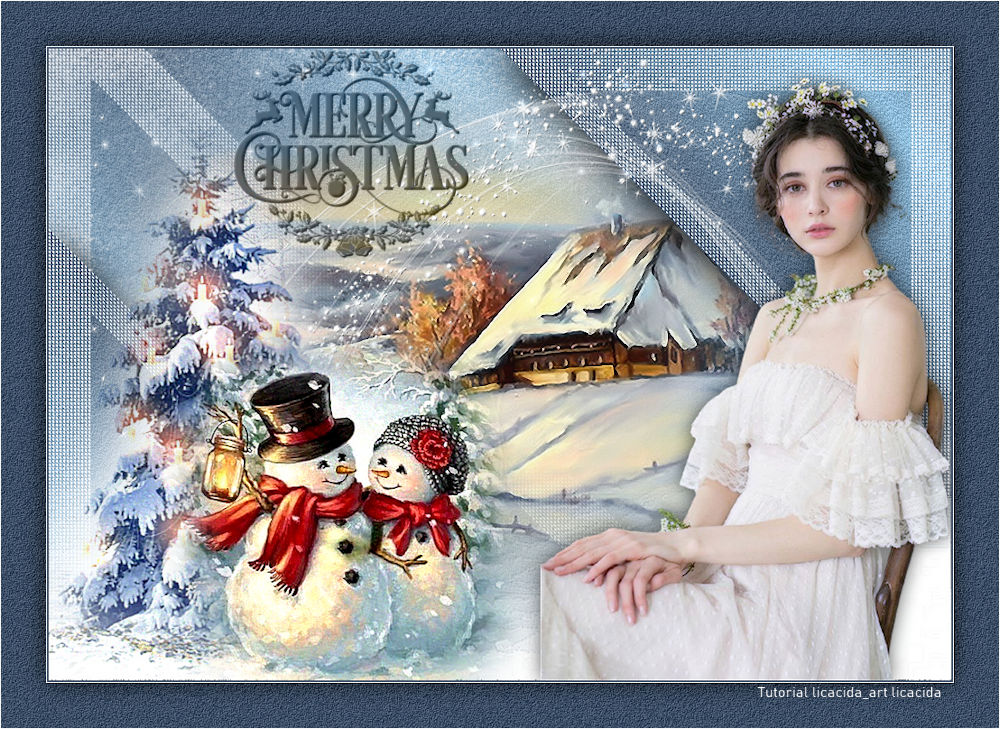
Merry Christmas Manuela
TRADUÇÕES

MATERIAL

Tubes: Callitubes-1532mulheres
misted_hiver7_tine_12.2020-137
TD_Tubes_Misted_Snowman_Xmas_01
Mask: NarahsMasks_1619
Brush: Brushe Etoiles --
Salvar na pasta Brushes do PSP.
Deco: natal-arquivi
nicole-sapin
snow_lc
Marca-d'água.
Efeitos do PSP.
Versão usada: PSP X9.
PLUGINS
Plugin [AFS IMPORT] → sqborder2
Plugin Alien Skin Eye Candy 5: Impact → Perspective Shadow
Plugin Alien Skin Eye Candy 5: Nature → Snow Drift
Plugin MuRa's Seamless → Duplicate
Plugin MuRa's Seamless → Emboss at Alpha
Plugin L en K's → Dimitri
Plugin FM Tile Tools → Blend Emboss
Plugin AAA Filters → Custom
TUTORIAL
|
Esta seta marca sua linha
Clique e arraste para movê-la
|
|
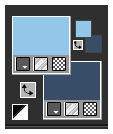
Configure: Foreground: #93c7e9 — Background: #394d67.
1_.
Abra uma nova imagem de 1000 x 700 px.
Pinte com o gradiente formado pelas cores acima.
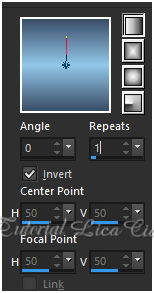
Configure: Style: Linear — Angle: 0 — Repeats: 1 — Invert marcado.
2_.
Adjust → Add/Remove Noise → Add Noise: 16% — Uniform — Monochrome marcado.
Plugin FM Tile Tools → Blend Emboss — Default.
3_.
Plugin [AFS IMPORT] → sqborder2: 34 / 34 / 255 / 0 / 0 / 0 / 0 / 0.
4_.
Effects → Geometric Effects → Skew.
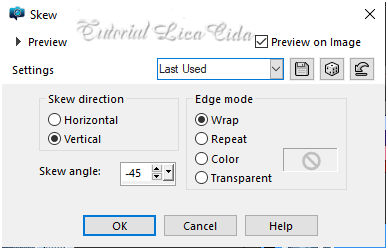
5_.
Layers → New Raster Layer.
Pinte com o gradiente acima, alterando Repeats para 0.
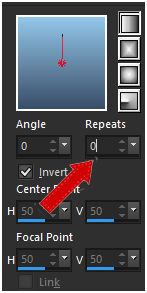
6_.
Repita: Plugin [AFS IMPORT] → sqborder2: 34 / 34 / 255 / 0 / 0 / 0 / 0 / 0.
7_.
Effects → Geometric Effects → Skew.
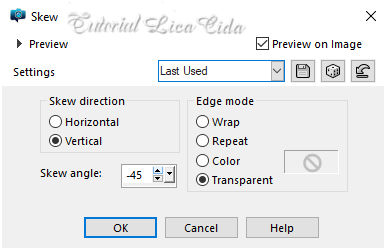
8_.
Com a ferramenta Magic Wand (Default), selecione as partes transparentes.
Selections → Invert.
Pressione a tecla Delete.
Selections → Invert.
9_.
Ative a Raster 1.
Selections → Promote Selection to Layer.
Selections → Select None.
10_.
Repita: Plugin [AFS IMPORT] → sqborder2: 34 / 34 / 255 / 0 / 0 / 0 / 0 / 0.
11_.
Plugin Alien Skin Eye Candy 5: Impact → Perspective Shadow.
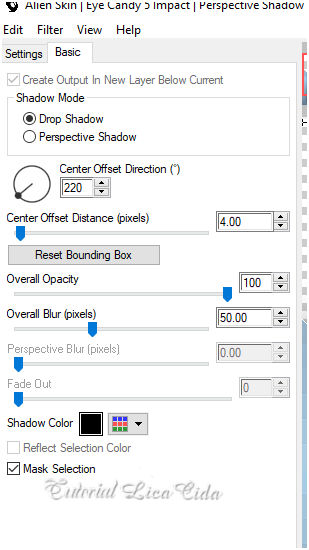
12_.
Ative novamente a Raster 1.
Plugin MuRa's Seamless → Duplicate.
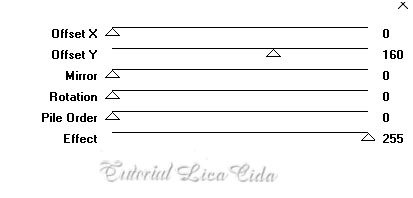
13_.
Plugin L en K's → Dimitri: 80 (Default).
14_.
Plugin Alien Skin Eye Candy 5: Nature → Snow Drift.
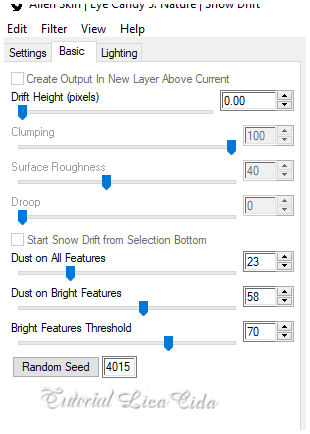
As layers estão assim:
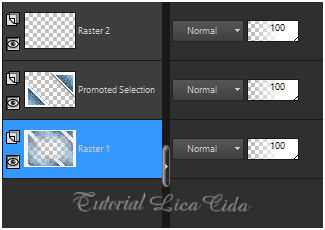
15_.
Ative a Raster 2.
Pinte com o gradiente formado no item 5.
Layers → Arrange → Send to Bottom.
16_.
Ative a Raster 1.
Edit → Copy no misted_hiver7_tine_12.2020-137
Edit → Paste As New Layer.
Adjust → Sharpness → Sharpen.
17_.
Edit → Copy no snow_lc
Edit → Paste As New Layer.
Layers → Arrange → Bring to Top (Raster 4).
Adjust → Sharpness → Sharpen More.
Objects → Align → Bottom.
18_.
Edit → Copy no nicole-sapin
Edit → Paste As New Layer.
Posicione. Não esqueça o chão.
Adjust → Sharpness → Sharpen More.
19_.
Plugin AAA Filters → Custom → Grain (Default).
20_.
Edit → Copy no tube TD_Tubes_Misted_Snowman_Xmas_01
Edit → Paste As New Layer.
Posicione.
Image → Resize: 80% — Resize all layers desmarcado (aplique duas vezes).
Adjust → Sharpness → Sharpen More.
21_.
Plugin AAA Filters → Custom → Grain (Default).
22_.
Layers → New Raster Layer.
Pinte com a cor #ffffff (use no Foreground).
Layers → New Mask Layer → From Image: NarahsMasks_1619.
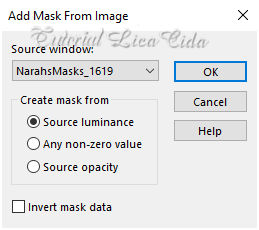
Effects → Edge Effects → Enhance.
Layers → Merge → Merge Group.
Plugin MuRa's Seamless → Emboss at Alpha — Default.
23_.
Layers → New Raster Layer.
Com a ferramenta Paint Brush (B), selecione o brush Brushe Etoiles e carimbe com a cor branca usada no Foreground.
Na mesma layer: canto superior direito e canto superior esquerdo (sem exagero).
24_.
Edit → Copy no tube Callitubes-1532mulheres
Edit → Paste As New Layer.
Image → Mirror → Mirror Horizontal.
Posicione.
Adjust → Sharpness → Sharpen.
25_.
Edit → Copy no natal-arquivi
Edit → Paste As New Layer.
Posicione.
Observação: use a layer da mask abaixo dos tubes nicole-sapin e TD_Tubes_Misted_Snowman_Xmas_01.
BORDAS
Image → Add Borders: 2 px, Symmetric marcado — Color: #394d67 (Background).
Image → Add Borders: 1 px, Symmetric marcado — Color: #ffffff.
Selections → Select All.
Image → Add Borders: 50 px, Symmetric marcado — Color: #394d67 (Background).
Effects → 3D Effects → Drop Shadow: 0 / 0 / 80 / 40,00 — Color: #000000.
Selections → Invert.
Adjust → Add/Remove Noise → Add Noise: 16% — Uniform — Monochrome marcado.
Plugin FM Tile Tools → Blend Emboss — Default.
Selections → Select None.
Image → Add Borders: 1 px, Symmetric marcado — Color: #ffffff.
Image → Resize: Width 1000 px.
Aplique a marca-d'água.
Assine e salve.
Espero que gostem.
Obrigada!
Aparecida / LicaCida, dezembro de 2021.
Rio de Janeiro - Brasil.

VOLTAR
Copyright ©2026 - Web Design - Naise Minas
|


