|
Marta
TRADUÇÕES

MATERIAL

Seleção: martasel1lc --
Salvar na pasta Selections do PSP.
Tubes: calguismistedwaterton16112011
tube2925_mulher_mara_pontes
SvB Vaas met tulpen
Mask: !!!!gradientedworisch
Decos: decomarta1lc
decomarta2lc
Brushes: Differentxdreamz - Simply Soft_17
Bird_Brushes_II_by_flordelys_stock_4
Back: cristallc
Marca-d'água.
Efeitos do PSP.
Versão usada: PSP X8.
PLUGINS
Plugin CPK Designs → Shadow Bevel
Plugin Alien Skin Eye Candy 5: Impact → Glass
Plugin &<Bkg Designer sf10 II>
TUTORIAL
|
Esta seta marca sua linha
Clique e arraste para movê-la
|
|
1_.
Abra uma nova imagem transparente de 950 x 650 px.
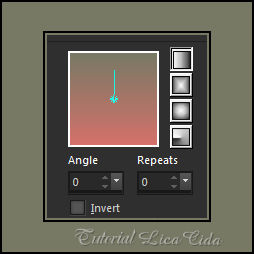
Pinte com o gradiente formado pelas cores #d4716a e #777964.
Configure: Style: Linear — Angle: 0 — Repeats: 0 — Invert desmarcado.
Layers → Duplicate.
2_.
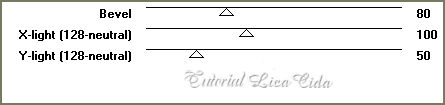
Plugin CPK Designs → Shadow Bevel.
3_.
Layers → New Raster Layer.
Selections → Select All.
Edit → Copy no tube calguismistedwaterton16112011
Edit → Paste Into Selection.
Selections → Select None.
Adjust → Blur → Motion Blur (aplique duas vezes).
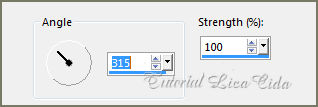
Blend Mode: Overlay.
Effects → Edge Effects → Enhance.
4_.
Edit → Copy no tube calguismistedwaterton16112011 (deverá estar na memória)
Edit → Paste As New Layer.
Image → Resize: 80% — Resize all layers desmarcado (duas vezes).
Layers → New Mask Layer → From Image: !!!!gradientedworisch.
A mask não deverá deixar marcas do tube usado.
Layers → Merge → Merge Group.
5_.
Ative a Copy of Raster 1.
Edit → Copy no decomarta1lc
Edit → Paste As New Layer.
Objects → Align → Right.
6_.
Ative a layer superior (Group - Raster 3).
Selections → Load/Save Selection → Load Selection From Disk → martasel1lc.
7_.
Layers → New Raster Layer.
Pinte com a cor usada no Background (#777964).
Selections → Select None.
Layers → Duplicate.
Image → Mirror → Mirror Horizontal.
Layers → Duplicate.
8_.
Effects → Image Effects → Offset.
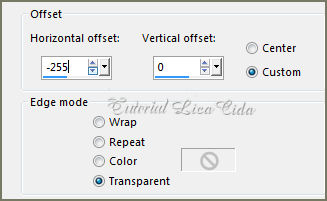
Layers → Merge → Merge Down (duas vezes).
Com a ferramenta Magic Wand (Default), selecione a parte externa da seleção.
Selections → Invert.
9_.
Selections → Modify → Contract: 18.
Pressione a tecla Delete.
10_.
Repita: Selections → Modify → Contract: 18.
11_.
Layers → New Raster Layer.
Pinte com o mesmo gradiente formado no item 1.
12_.
Edit → Copy no tube calguismistedwaterton16112011
Edit → Paste Into Selection.
13_.
Plugin Alien Skin Eye Candy 5: Impact → Glass.
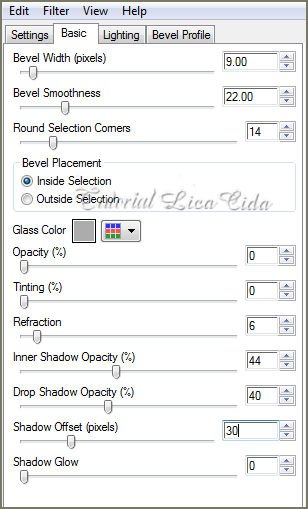
Selections → Select None.
14_.
Ative a Raster 4.
Effects → Image Effects → Offset.
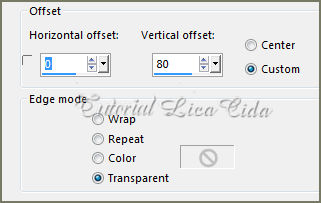
Ative novamente a Raster 5.
Layers → Merge → Merge Down.
Effects → 3D Effects → Drop Shadow: 0 / 0 / 80 / 40,00 — Color: #000000.
15_.
Ative a Raster 1.
Effects → Artistic Effects → Halftone.
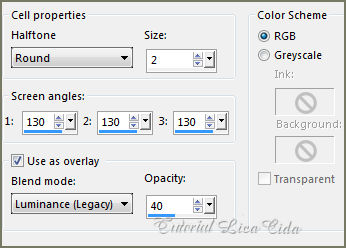
16_.
Ative a sua cópia (Copy of Raster 1).
Plugin &<Bkg Designer sf10 II>.
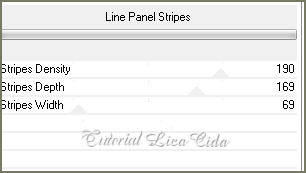
17_.
Layers → Duplicate.
Effects → Geometric Effects → Perspective - Vertical: -50 — Transparent.
Com a ferramenta Pick Tool, diminua o efeito para 540 px e, em seguida, leve o efeito um pouco para a esquerda (veja o print).
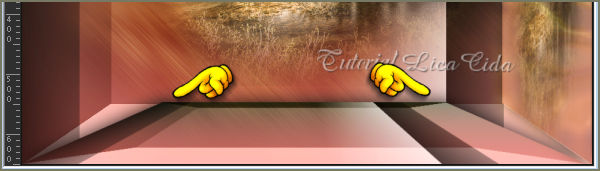
Effects → 3D Effects → Drop Shadow: 0 / 0 / 80 / 40,00 — Color: #000000.
Effects → Edge Effects → Enhance.
18_.
Edit → Copy no brush Differentxdreamz - Simply Soft_17
Edit → Paste As New Layer.
19_.
Ative a Raster 3.
Edit → Copy no decomarta2lc
Edit → Paste As New Layer.
Layers → Duplicate.
Image → Mirror → Mirror Vertical.
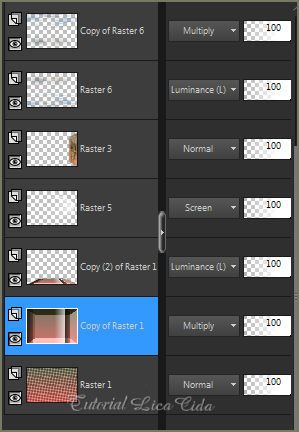
Altere os Blend Modes e a Opacity das layers.
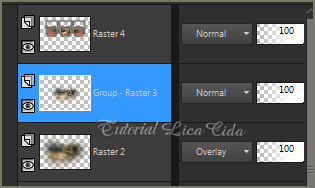
20_.
Ative a Group - Raster 3.
Edit → Copy no brush Bird_Brushes_II_by_flordelys_stock_4
Edit → Paste As New Layer.
21_.
Ative a Raster 4.
Edit → Copy no cristallc
Edit → Paste As New Layer.
Image → Add Borders: 1 px, Symmetric marcado — Color: #777964 (cor do Background).
Image → Add Borders: 1 px, Symmetric marcado — Color: #d4716a (cor do Foreground).
22_.
Edit → Copy.
Image → Add Borders: 40 px, Symmetric marcado — Color: #ffffff.
Selecione a borda.
Edit → Paste Into Selection.
Selections → Select None.
Faça o acabamento a gosto.
23_.
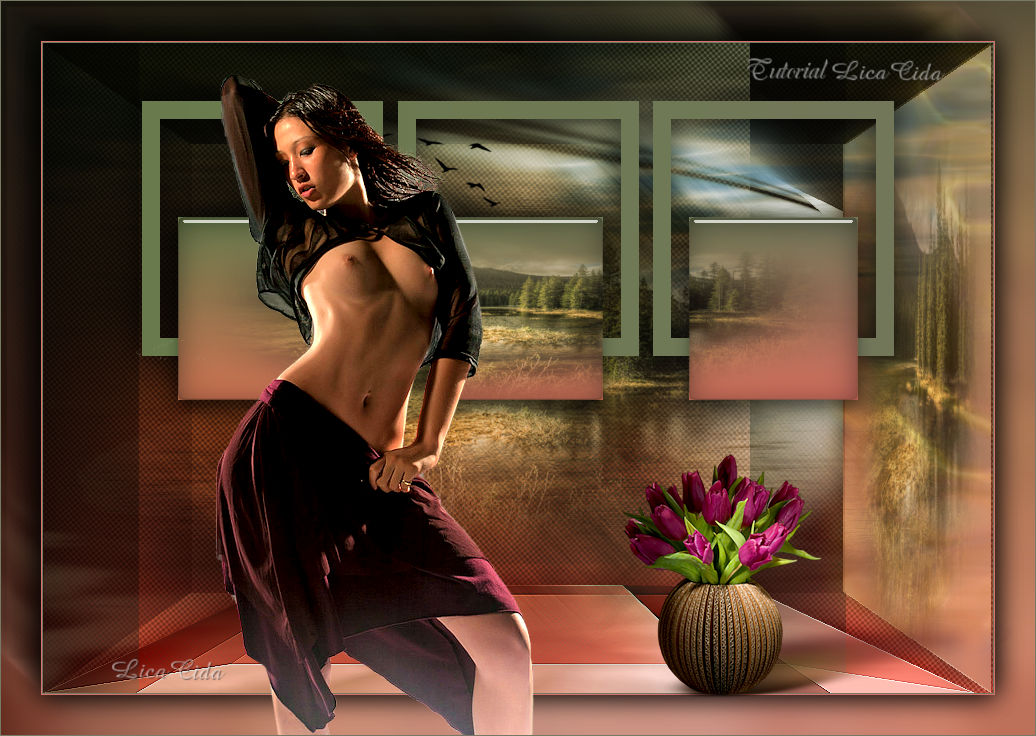
Edit → Copy no tube tube2925_mulher_mara_pontes
Edit → Paste As New Layer.
Posicione.
24_.
Edit → Copy no tube SvB Vaas met tulpen
Edit → Paste As New Layer.
Use a gosto.
Image → Add Borders: 1 px, Symmetric marcado — Color: #d4716a (cor do Foreground).
Aplique a marca-d'água.
Assine e salve.
Espero que gostem.
Aparecida / LicaCida, setembro de 2015.
Rio de Janeiro - Brasil.


VOLTAR
Copyright ©2026 - Web Design - Naise Minas
|

