|
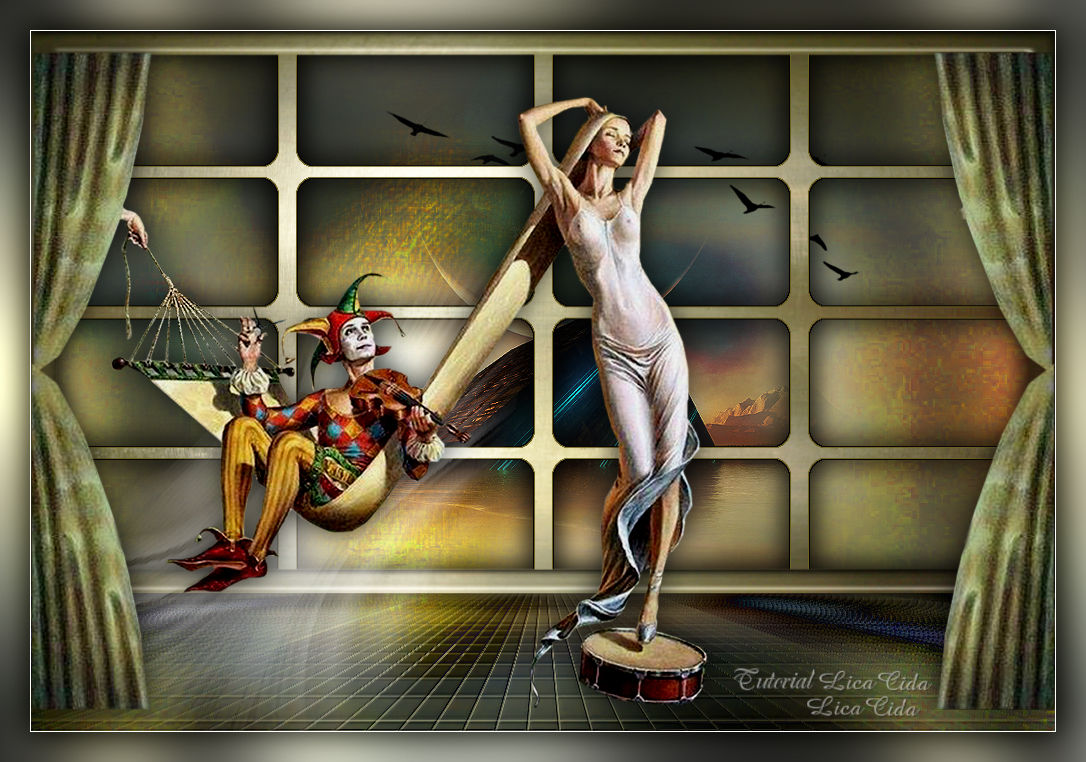
Magic
TRADUÇÕES

MATERIAL

Preset: Preset_SmudgeBrush_ajustepaisagem (marapontes) --
Salvar na pasta Presets do PSP.
Tubes: 4511-luzcristina
3576-luzcristina
Bird_Brushes_II_by_flordelys_stock_4
Imagem: sunset-colors-1505319 --
Procure uma imagem que se integre ao seu tube.
Deco: decolc
Back: back (arquivo net)
Marca-d'água.
Efeitos do PSP.
Versão usada: PSP X8.
PLUGINS
Plugin MuRa's Seamless → Tile Frame
Plugin MuRa's Meister → Perspective Tiling
Plugin MuRa's Meister → Cloud
Plugin Flaming Pear → Melancholytron
Plugin Graphics Plus → Cross Shadow
TUTORIAL

|
Esta seta marca sua linha
Clique e arraste para movê-la
|
|
1_.
Abra uma nova imagem transparente de 1024 x 600 px.
Plugin MuRa's Seamless → Tile Frame.
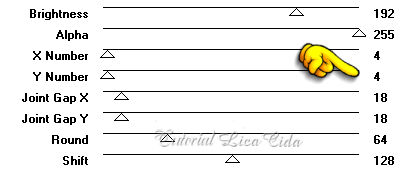
Com a ferramenta Magic Wand (Default), com a tecla Shift pressionada, selecione as partes cinzas do efeito.
2_.
Edit → Copy no back
Edit → Paste Into Selection.
3_.
Effects → 3D Effects → Chisel — Color: #8b792a.
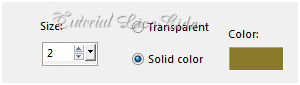
Selections → Select None.
4_.
Layers → New Raster Layer.
Selections → Select All.
Selections → Modify → Select Selection Borders.
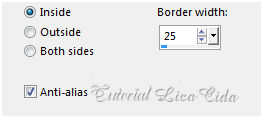
Edit → Paste Into Selection (o back).
5_.
Effects → 3D Effects → Inner Bevel.
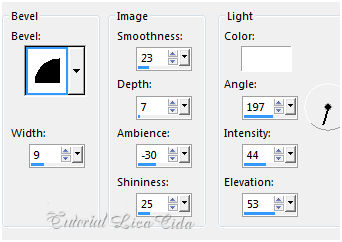
Selections → Select None.
Layers → Merge → Merge Down.
6_.
Image → Canvas Size: 1024 x 700.
7_.
Layers → New Raster Layer.
Layers → Arrange → Send to Bottom.
Selections → Select All.
Edit → Paste Into Selection (o back).
Selections → Select None.
Layers → Duplicate.
8_.
Effects → Texture Effects → Tiles.
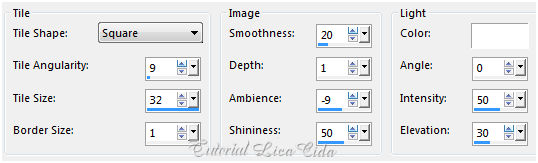
9_.
Plugin MuRa's Meister → Perspective Tiling.
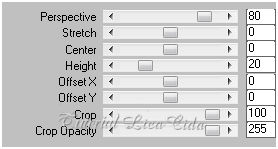
Effects → User Defined Filter → Emboss_3.
10_.
Ative a Raster 1 e suba o efeito (observe o print).
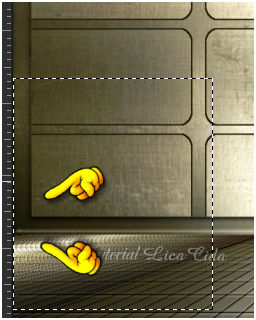
Effects → 3D Effects → Drop Shadow: 0 / 0 / 80 / 40,00 — Color: #000000.
11_.
Ative a Raster 2.
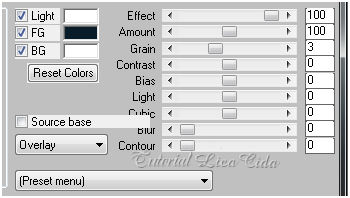
Configure: Foreground: #091c2a — Background: #ffffff.
Plugin MuRa's Meister → Cloud (Overlay).
12_.
Edit → Copy no tube 3576-luzcristina
Edit → Paste As New Layer.
Adjust → Sharpness → Sharpen.
13_.
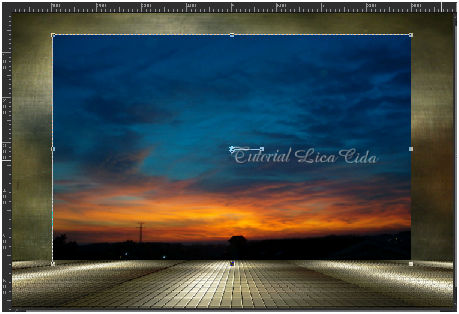
Edit → Copy na imagem sunset-colors-1505319
Edit → Paste As New Layer.
Com a ajuda da ferramenta Pick Tool, ajuste a imagem para que fique assim:
OBSERVAÇÃO
Retire a visibilidade da Raster 1 para visualizar melhor o seu trabalho.
14_.
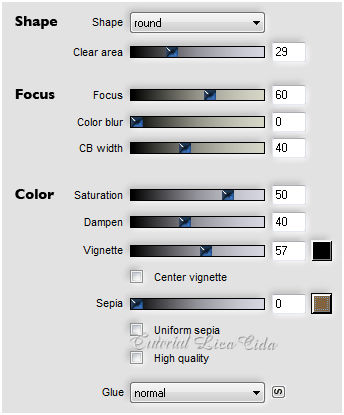
Plugin Flaming Pear → Melancholytron (cores #000000 e #82633f).
15_.
Ative a ferramenta Smudge.
Procure o Preset_SmudgeBrush_ajustepaisagem ou configure:

Aplique o Smudge nas laterais, integrando a paisagem ao back.
Blend Mode: Overlay (use a gosto; depois de acertar o Blend Mode, arrume o back com a ferramenta Smudge).
16_.
Edit → Copy no Bird_Brushes_II_by_flordelys_stock_4
Edit → Paste As New Layer.
Posicione.
17_.
Layers → New Raster Layer.
Layers → Arrange → Send to Bottom.
Pinte com a cor #82633f.
Ative novamente a visibilidade da Raster 1 e ative essa layer.
Layers → Duplicate.
18_.
Layers → New Adjustment Layer → White Balance.
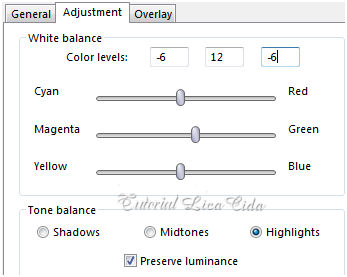
Use o Blend Mode e a Opacity a gosto.
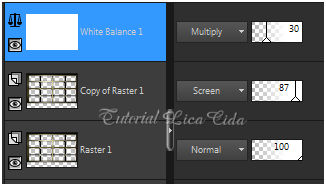
Layers → Merge → Merge Down (duas vezes).
19_.
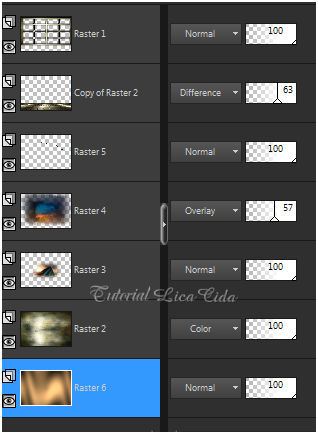
Ative a Raster 6.
Plugin Graphics Plus → Cross Shadow — Default.
Altere os Blend Modes e a Opacity das layers a gosto.
20_.
Edit → Copy no decolc
Edit → Paste As New Layer.
Posicione de acordo com o seu tube.
21_.
Edit → Copy no tube 4511-luzcristina
Edit → Paste As New Layer.
Objects → Align → Left.
Repita o procedimento na outra parte da cortina: Objects → Align → Right.
Opcional nos tubes: Effects → 3D Effects → Drop Shadow: 0 / 0 / 80 / 40,00 — Color: #000000.
Image → Add Borders: 1 px, Symmetric marcado — Color: #ffffff.
Edit → Copy.
Image → Add Borders: 30 px, Symmetric marcado — cor a gosto.
Selecione a borda.
Edit → Paste Into Selection.
Adjust → Blur → Gaussian Blur — Radius: 30,00.
Plugin Graphics Plus → Cross Shadow — Default.
Selections → Invert.
Effects → 3D Effects → Drop Shadow: 0 / 0 / 80 / 40,00 — Color: #000000.
Selections → Select None.
Aplique a marca-d'água.
Assine e salve.
Espero que gostem.
Aparecida / LicaCida.
Rio de Janeiro - Brasil.

VOLTAR
Copyright ©2026 - Web Design - Naise Minas
|

