|
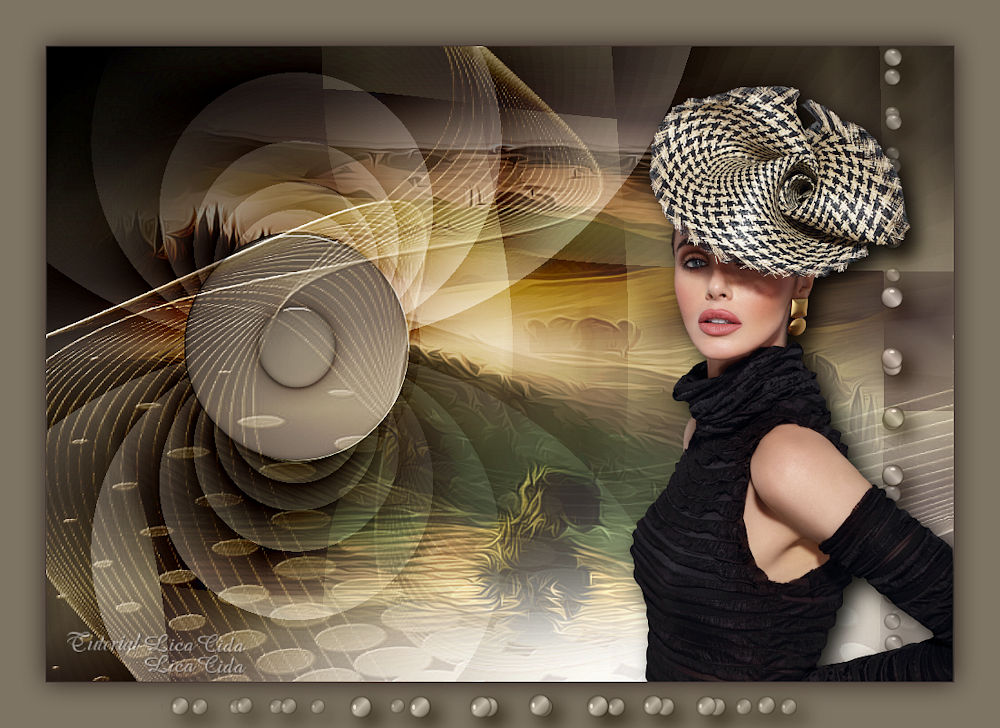
Imagination
TRADUÇÕES

MATERIAL

Seleção: circle_lc --
Salvar na pasta Selections do PSP.
Mask: adita_mask_02
Tubes: Tube AS 745-6
vvs-paisagem0424
Deco: elemento_lc
Filtro: VM Stylize --
Importar para o Filters Unlimited (segue anexado).
Marca-d'água.
Efeitos do PSP.
Versão usada: PSP X9.
PLUGINS
Plugin Mehdi → Sorting Tiles
Plugin Filter Factory Gallery Q → Gravity Blossom
Plugin Alien Skin Eye Candy 5: Impact → Glass
Plugin Alien Skin Eye Candy 5: Impact → Perspective Shadow
Plugin Unlimited 2.0 → VM Stylize → Marble Madness
Plugin MuRa's Seamless → Emboss at Alpha
TUTORIAL
|
Esta seta marca sua linha
Clique e arraste para movê-la
|
|
1_.
Abra uma nova imagem de 1000 x 700 px.
Pinte com o gradiente formado pelas cores #433b38 (use no Foreground) e #7d7767 (use no Background).
Configure: Style: Linear — Angle: 0 — Repeats: 6 — Invert desmarcado.
Layers → Duplicate.
2_.
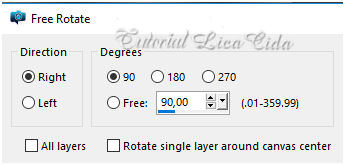
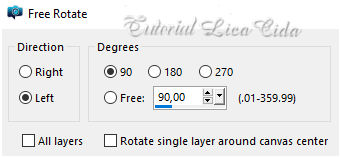
Image → Free Rotate.
3_.
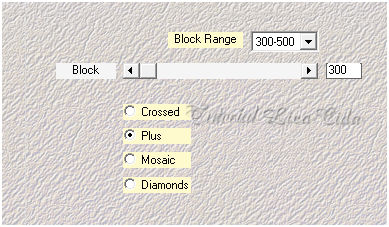
Plugin Mehdi → Sorting Tiles.
4_.
Image → Free Rotate.
5_.
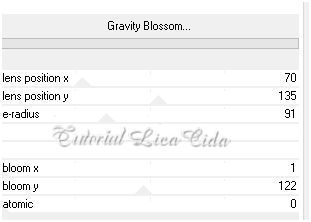
Plugin Filter Factory Gallery Q → Gravity Blossom.
6_.
Selections → Load/Save Selection → Load Selection From Disk → circle_lc.
7_.
Layers → New Raster Layer.
Pinte com o gradiente formado pelas cores acima.
Configure: Style: Sunburst — Repeats: 0 — Invert marcado — Center Point e Focal Point: 50.
8_.
Plugin Alien Skin Eye Candy 5: Impact → Glass — Settings: Clear.
9_.
Selections → Modify → Contract: 80 px.
Effects → 3D Effects → Drop Shadow: 0 / 0 / 80 / 40,00 — Color: #000000.
10_.
Repita o Plugin Alien Skin Eye Candy 5: Impact → Glass — Settings: Clear.
Selections → Select None.
Layers → Merge → Merge Down.
11_.
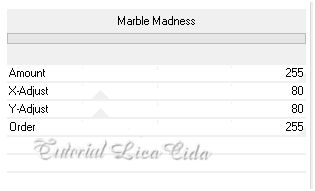
Plugin Unlimited 2.0 → VM Stylize → Marble Madness (o efeito poderá aparecer em outro plugin).
Layers → Duplicate.
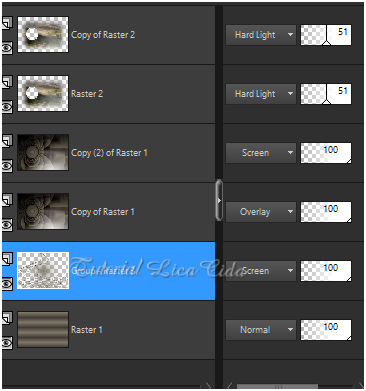
Blend Mode: Screen.
Na layer inferior (Copy of Raster 1): Blend Mode: Overlay.
12_.
Ative a layer superior.
Layers → New Raster Layer.
Selections → Select All.
Edit → Copy no vvs-paisagem0424
Edit → Paste Into Selection.
Selections → Select None.
13_.
Selections → Load/Save Selection → Load Selection From Disk → circle_lc.
Pressione a tecla Delete.
Selections → Select None.
14_.
Repita o plugin do item 11 (VM Stylize — veja o print).
Use valores de acordo com o seu gosto e com a paisagem.
Blend Mode: Hard Light — Opacity: 51% (a gosto).
Plugin MuRa's Seamless → Emboss at Alpha — Default.
Layers → Duplicate.
15_.
Ative a Raster 1.
Layers → New Raster Layer.
Pinte a layer com a cor do Background.
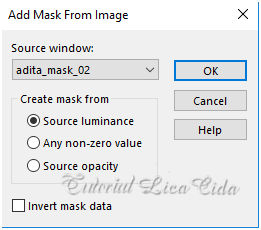
Layers → New Mask Layer → From Image: adita_mask_02.
Effects → Edge Effects → Enhance.
Layers → Merge → Merge Group.
Plugin MuRa's Seamless → Emboss at Alpha — Default.
Blend Mode: Screen.
LAYERS
Altere os Blend Modes e a Opacity das layers a gosto.
16_.
Edit → Copy no elemento_lc
Edit → Paste As New Layer.
Layers → Arrange → Bring to Top.
Posicione como no modelo.
Blend Mode: Luminance (L).
Plugin Alien Skin Eye Candy 5: Impact → Perspective Shadow — Settings: Drop Shadow, Blurry.
17_.
Edit → Copy no tube Tube AS 745-6
Edit → Paste As New Layer.
Posicione.
Plugin Alien Skin Eye Candy 5: Impact → Perspective Shadow — Settings: Drop Shadow, Blurry.
18_.
Image → Add Borders: 1 px, Symmetric marcado — Color: Foreground (#433b38).
Image → Add Borders: 50 px, Symmetric marcado — Color: Background (#7d7767).
Com a ferramenta Magic Wand, selecione a borda.
Selections → Invert.
Effects → 3D Effects → Drop Shadow: 0 / 0 / 80 / 40,00 — Color: #000000.
Selections → Select None.
Opcional: Edit → Copy no elemento_lc
Edit → Paste As New Layer (veja o modelo).
Image → Resize: Width 1000 px.
Aplique a marca-d'água.
Assine e salve.
Espero que gostem.
Obrigada!
Aparecida / LicaCida, abril de 2021.
Rio de Janeiro - Brasil.

VOLTAR
Copyright ©2026 - Web Design - Naise Minas
|


