|
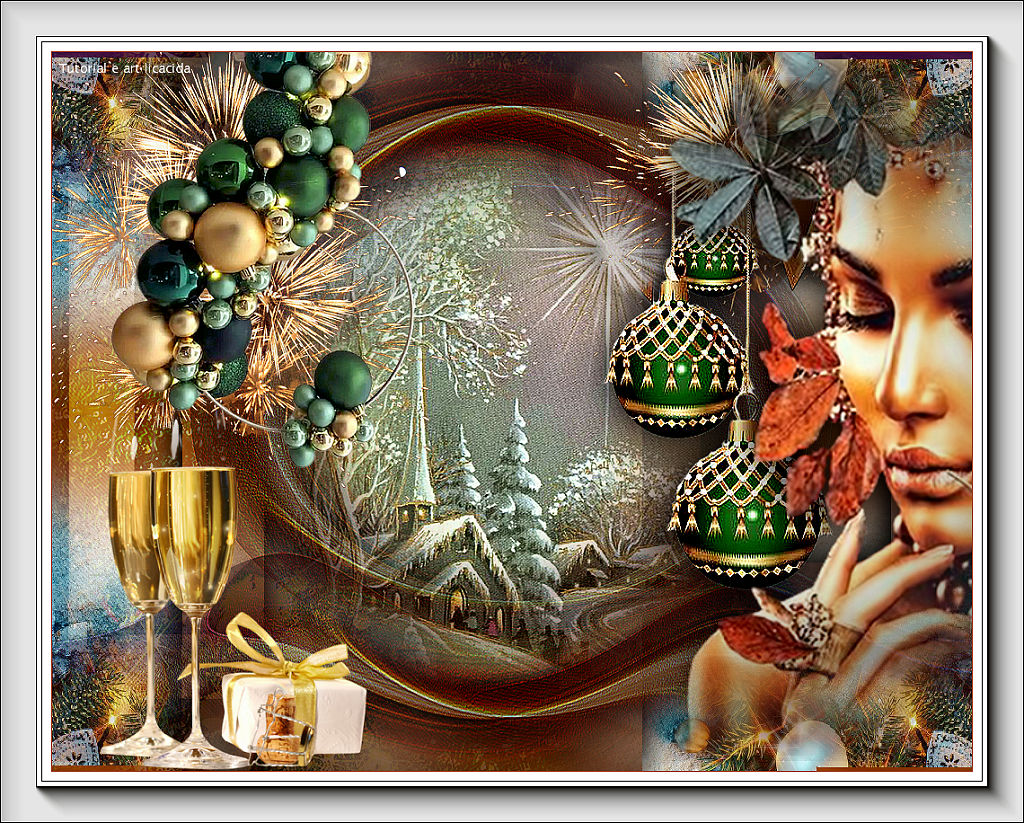
Happy Holidays 2023
TRADUÇÕES

MATERIAL

Seleções: guardadas no canal alfa da imagem alphachannelhappyholidays (Selection #1 a #5).
Divers: bolamirror_mp
12283242587_divers_nikita
Tubes: Callitubes-2718mulheres
Callitubes-120natal
Callitubes-121natal
Callitubes-136natal
Callitubes-139natal
Mask: 20 20
Decor: decotubeCallitubes-107natal_bylc
MR_Champagne Glasses
Os ornamentos estão no arquivo ornamentação.rar, dentro do material.
Marca-d'água.
Efeitos do PSP.
PLUGINS
Plugin Alien Skin Eye Candy 5: Impact → Perspective Shadow
Plugin MuRa's Meister → Pole Transform
Plugin Carolaine and Sensibility → CS-DLines
Plugin VM Natural → Weave Distortion
Plugin Graphics Plus → Cross Shadow
Plugin AAA Frames → Foto Frame
TUTORIAL
|
Esta seta marca sua linha
Clique e arraste para movê-la
|
|
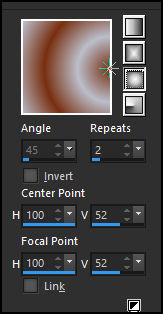
Configure as cores: Foreground: #782f10 (cor escura) — Background: #bbbecb (cor clara).
1_.
Abra o arquivo alphachannelhappyholidays.
Pinte com o gradiente formado pelas cores configuradas acima — Style: Sunburst.
2_.
Selections → Select All.
Edit → Copy no tube Callitubes-2718mulheres (use a Raster 1, o tube original).
Edit → Paste Into Selection.
Selections → Select None.
3_.
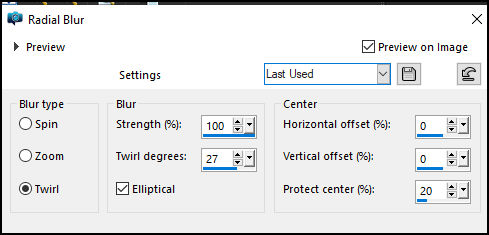
Adjust → Blur → Radial Blur.
Layers → Duplicate.
4_.
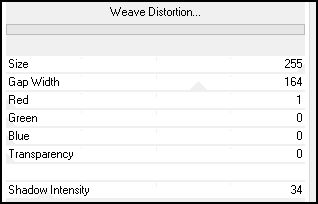
Plugin VM Natural → Weave Distortion.
5_.
Selections → Load/Save Selection → Load Selection From Alpha Channel → Selection #1.
6_.
Selections → Modify → Contract: 90 px.
Pressione a tecla Delete do teclado.
Selections → Select None.
7_.
Selections → Load/Save Selection → Load Selection From Alpha Channel → Selection #2.
8_.
Selections → Modify → Contract: 90 px.
Pressione a tecla Delete do teclado.
Selections → Select None.
9_.
Selections → Load/Save Selection → Load Selection From Alpha Channel → Selection #3.
Pressione a tecla Delete do teclado.
Selections → Select None.
10_.
Selections → Load/Save Selection → Load Selection From Alpha Channel → Selection #4.
Pressione a tecla Delete do teclado.
Selections → Select None.
11_.
Selections → Load/Save Selection → Load Selection From Alpha Channel → Selection #5.
Pressione a tecla Delete do teclado.
Selections → Select None.
12_.
Layers → Duplicate.
Image → Resize: 80% — Resize all layers desmarcado.
Blend Mode: Soft Light.
13_.
Plugin Carolaine and Sensibility → CS-DLines: Default (40 / 5).
Effects → Image Effects → Offset: H: -200 / V: 0 — Custom e Transparent marcados.
Plugin Alien Skin Eye Candy 5: Impact → Perspective Shadow: use a gosto nos efeitos das layers acima.
14_.
Ative a Raster 1.
Plugin Graphics Plus → Cross Shadow / Quick Tile I: Default (128 / 128 / 128).
15_.
Edit → Copy no decotubeCallitubes-107natal_bylc
Edit → Paste As New Layer (já posicionado).
16_.
Edit → Copy no tube Callitubes-121natal
Edit → Paste As New Layer.
Objects → Align → Left.
Blend Mode: Lighten.
Effects → User Defined Filter → Emboss_3.
17_.
Ative a layer do topo.
Edit → Copy no bolamirror_mp
Edit → Paste As New Layer.
Adjust → Sharpness → Sharpen.
Plugin Alien Skin Eye Candy 5: Impact → Perspective Shadow: use a gosto.
Acompanhe as layers:
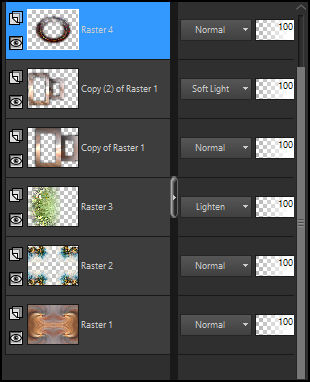
Layers → Duplicate (Raster 4).
18_.
Plugin MuRa's Meister → Pole Transform: Default — Inverse marcado.
Effects → Image Effects → Offset: H: 0 / V: 200 — Custom e Transparent marcados.
Layers → Duplicate.
Image → Mirror → Mirror Vertical.
Layers → Merge → Merge Down.
19_.
Ative a Raster 4.
Edit → Copy no tube Callitubes-120natal
Edit → Paste As New Layer.
Image → Resize: 80% — Resize all layers desmarcado.
Adjust → Sharpness → Sharpen More.
Adjust → One Step Photo Fix.
20_.
Edit → Copy no tube Callitubes-2718mulheres
Edit → Paste As New Layer (use a Raster 4, já com a mask 20 20 aplicada).
A mask segue anexada no material: use-a caso seu tube fique bruto no tutorial.
Adjust → Sharpness → Sharpen.
Plugin Alien Skin Eye Candy 5: Impact → Perspective Shadow: use a gosto.
21_.
As ornamentações estão anexadas no material, com os créditos acima. Use a gosto.
Adjust → Sharpness → Sharpen.
Plugin Alien Skin Eye Candy 5: Impact → Perspective Shadow: use a gosto.
BORDAS
Image → Add Borders: 1 px, Symmetric marcado — Color: escura.
Image → Add Borders: 10 px, Symmetric marcado — Color: #ffffff.
Image → Add Borders: 1 px, Symmetric marcado — Color: #000000.
Image → Add Borders: 5 px, Symmetric marcado — Color: #ffffff.
Image → Add Borders: 1 px, Symmetric marcado — Color: escura.
Image → Add Borders: 40 px, Symmetric marcado — Color: #ffffff.
22_.
Plugin AAA Frames → Foto Frame: Default.
Image → Resize — Width: 1024 px.
Aplique a marca-d'água.
Assine e salve.
Espero que apreciem.
Obrigada!
Aparecida / LicaCida, novembro de 2022.
Rio de Janeiro - Brasil.

VOLTAR
Copyright ©2026 - Web Design - Naise Minas
|


