|
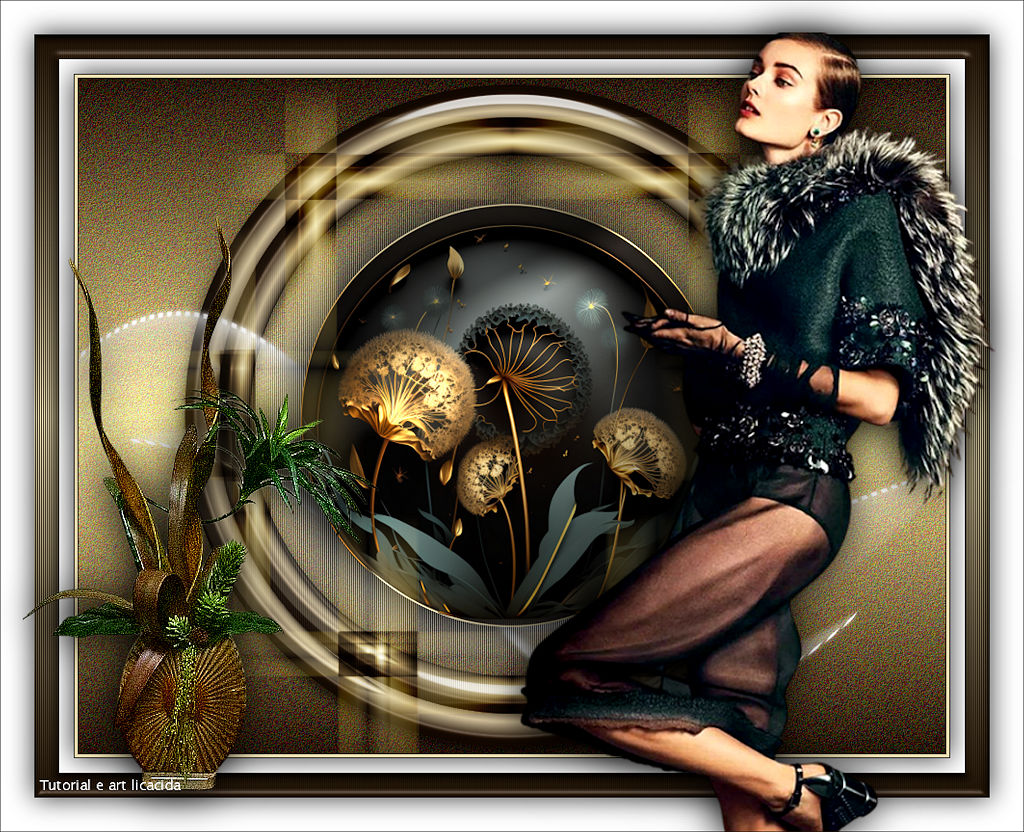
Forget You
TRADUÇÕES

MATERIAL

Seleção: Sel_ Forget You_ --
Salvar na pasta Selections do PSP.
Preset: Illumination → Lights → Preset_Lights_araralightdw --
Salvar na pasta Presets do PSP.
Tubes: Callitubes-2401mulheres
Renee-TUBES-Avril-2023-29
Callitubes-283flores (1)
Deco: decolc
Marca-d'água.
Efeitos do PSP.
PLUGINS
Plugin Alien Skin Eye Candy 5: Impact → Extrude
Plugin Alien Skin Eye Candy 5: Impact → Glass
Plugin Alien Skin Eye Candy 5: Impact → Perspective Shadow
Plugin MuRa's Meister → Pole Transform
Plugin Mehdi → Weaver
Plugin FM Tile Tools → Saturation Emboss
TUTORIAL
|
Esta seta marca sua linha
Clique e arraste para movê-la
|
|
Configure: Foreground: #1d1105 — Background: #ecdfb2.
1_.
Abra uma nova imagem transparente de 900 x 700 px.
2_.
Pinte com o gradiente formado pelas cores configuradas acima.
Configure: Style: Linear.
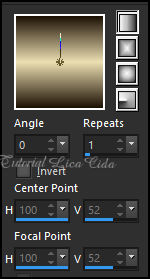
3_.
Selections → Load/Save Selection → Load Selection From Disk → Sel_ Forget You_.
4_.
Layers → New Raster Layer.
Pinte com o gradiente em uso.
5_.
Effects → 3D Effects → Inner Bevel.
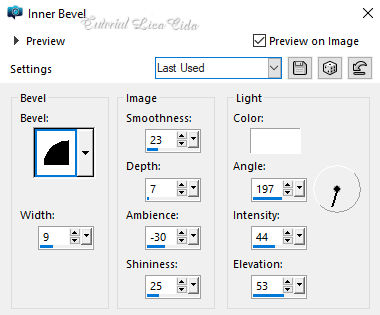
Selections → Select None.
6_.
Plugin Alien Skin Eye Candy 5: Impact → Extrude — Color: a cor usada no Background.
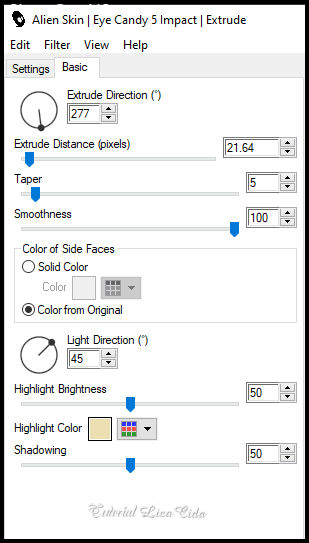
7_.
Plugin MuRa's Meister → Pole Transform.
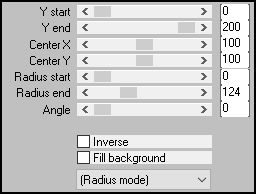
Layers → Duplicate.
Image → Mirror → Mirror Vertical.
Layers → Merge → Merge Down.
8_.
Layers → Duplicate.
Image → Resize: 90% — Resize all layers desmarcado.
Layers → Duplicate (Copy of Raster 2).
9_.
Plugin Mehdi → Weaver.
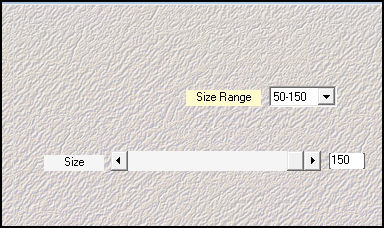
Blend Mode: Hard Light.
10_.
Ative a layer Copy of Raster 2.
Layers → Merge → Merge Down.
11_.
Plugin Alien Skin Eye Candy 5: Impact → Glass — Clear (use a gosto).
Plugin Alien Skin Eye Candy 5: Impact → Perspective Shadow, a gosto.
12_.
Edit → Copy no Renee-TUBES-Avril-2023-29
Edit → Paste As New Layer.
Plugin Alien Skin Eye Candy 5: Impact → Perspective Shadow, a gosto.
13_.
Effects → 3D Effects → Drop Shadow: -15 / -15 / 100 / 100,00 — Color: #ffffff — Shadow on new layer marcado.
14_.
Ative a layer inferior.
Effects → Texture Effects → Blinds.
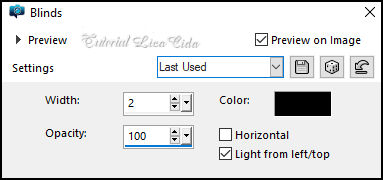
15_.
Ative a Raster 3.
Effects → Illumination Effects → Lights → Preset_Lights_araralightdw (aplique duas vezes).
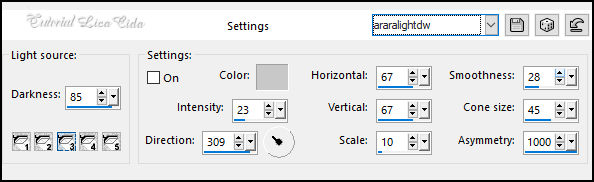
16_.
Ative a Raster 2.
Edit → Copy no decolc
Edit → Paste As New Layer.
Com a ferramenta Pick Tool:
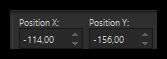
Position X: -114,00 / Position Y: -156,00.
LAYERS
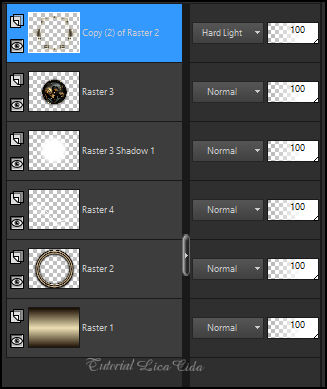
17_.
Ative a Raster 1.
Adjust → Add/Remove Noise → Add Noise: Uniform — 20.
18_.
Plugin FM Tile Tools → Saturation Emboss — Default.
BORDAS
19_.
Image → Add Borders: 1 px, Symmetric marcado — Color: cor escura.
Image → Add Borders: 3 px, Symmetric marcado — Color: cor clara.
Image → Add Borders: 1 px, Symmetric marcado — Color: cor escura.
Selections → Select All.
Image → Add Borders: 15 px, Symmetric marcado — Color: #ffffff.
Effects → 3D Effects → Drop Shadow: 0 / 0 / 80 / 40,00 — Color: #000000.
Selections → Select None.
Image → Add Borders: 1 px, Symmetric marcado — Color: cor escura.
Selections → Select All.
Image → Add Borders: 25 px, Symmetric marcado — Color: #ffffff.
Selections → Invert.
20_.
Pinte com o gradiente formado no item 2.
21_.
Aplique o efeito do item 14, usando a cor do Foreground:
Effects → Texture Effects → Blinds.
22_.
Effects → 3D Effects → Inner Bevel.

Selections → Select All.
Image → Add Borders: 35 px, Symmetric marcado — Color: #ffffff.
Effects → 3D Effects → Drop Shadow: 0 / 0 / 80 / 40,00 — Color: #000000.
Selections → Select None.
23_.
Edit → Copy no tube Callitubes-2401mulheres
Edit → Paste As New Layer.
Posicione. Aplique Resize, se for necessário.
Aplique sombra a gosto.
24_.
Edit → Copy no Callitubes-283flores (1)
Edit → Paste As New Layer.
Posicione. Aplique sombra a gosto.
Image → Add Borders: 1 px, Symmetric marcado — Color: cor escura.
Aplique a marca-d'água.
Assine e salve.
Aparecida / LicaCida.
Rio de Janeiro - Brasil.

VOLTAR
Copyright ©2026 - Web Design - Naise Minas
|


