|
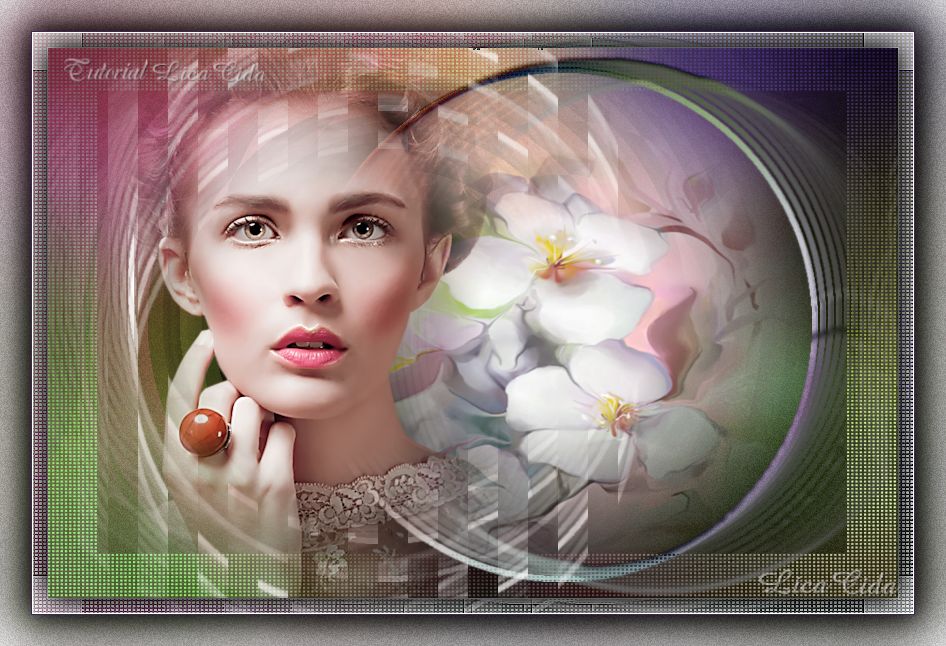
Eu Sei Que Vou Te Amar
DEDICATÓRIA
Dedico carinhosamente este tutorial à querida amiga Nines.
E... curiosamente pronto no dia dos "100 anos" do nosso querido Vinicius de Moraes.
TRADUÇÕES

MATERIAL

Seleção: 007lc --
Salvar na pasta Selections do PSP.
Tubes: misted_visage_sublime_16_tubed_by_thafs
Radyga-tubes-0212-1710-2013
Backs: Pink-Roses_tubed_by_thafs
colorida2-rb (Regina Barbeiro)
Marca-d'água.
Efeitos do PSP.
Versão usada: PSP X5.
PLUGINS
Plugin Filter Factory Gallery C → Interference
Plugin MuRa's Meister → Copies
Plugin dsb flux → Linear Transmission
Plugin Transparency → Eliminate White
Plugin Nik Software → Color Efex Pro 3.0 → Bi-Color User Defined
Plugin Filters Unlimited 2 → &<Bkg Designer sf10 I> → Cruncher
TUTORIAL

|
Esta seta marca sua linha
Clique e arraste para movê-la
|
|
1_.
Abra uma nova imagem transparente de 850 x 550 px.
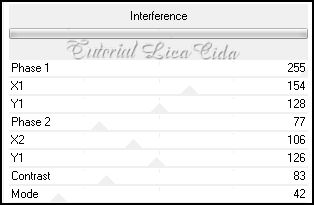
Plugin Filter Factory Gallery C → Interference.
2_.
Selections → Load/Save Selection → Load Selection From Disk → 007lc.
Layers → New Raster Layer.
Pinte com a cor #ffffff.
3_.
Selections → Modify → Contract: 6.
Pressione a tecla Delete.
Layers → New Raster Layer.
Edit → Copy no Radyga-tubes-0212-1710-2013
Edit → Paste Into Selection.
Selections → Select None.
4_.
Ative a Raster 2.
Plugin MuRa's Meister → Copies: *Blur(h-wave) — Default.
Layers → Duplicate.
5_.
Image → Mirror.
Plugin dsb flux → Linear Transmission.
Repita.

6_.
Ative a Raster 1.
Plugin Transparency → Eliminate White.
7_.
Layers → New Raster Layer.
Selections → Select All.
Edit → Copy no back Pink-Roses_tubed_by_thafs
Edit → Paste Into Selection.
Selections → Select None.
8_.
Plugin Nik Software → Color Efex Pro 3.0 → Bi-Color User Defined — Color: #e4e7fa (nas duas opções).

Adjust → Add/Remove Noise → Add Noise: Uniform e Monochrome marcados — Noise: 12.
9_.
Layers → New Raster Layer.
Layers → Arrange → Send to Bottom.
Selections → Select All.
Edit → Copy no colorida2-rb
Edit → Paste Into Selection.
Selections → Select None.
Altere os Blend Modes e a Opacity das layers.

10_.
Ative a Raster 3.
Edit → Copy no tube misted_visage_sublime_16_tubed_by_thafs
Edit → Paste As New Layer.
Image → Resize: 80% — Resize all layers desmarcado.
Posicione.
11_.
Image → Add Borders: 15 px, Symmetric marcado — Color: #ffffff.
Selecione a borda.
Plugin Filters Unlimited 2 → &<Bkg Designer sf10 I> → Cruncher: 20 / 20.
Effects → Edge Effects → Enhance More.
Selections → Invert.
Effects → 3D Effects → Drop Shadow: 0 / 0 / 80 / 40,00 — Color: #000000.
Selections → Select None.
12_.
Image → Add Borders: 1 px, Symmetric marcado — Color: #ffffff.
Image → Add Borders: 1 px, Symmetric marcado — Color: use uma cor vibrante (#3d2e4d).
Edit → Copy.
13_.
Image → Add Borders: 30 px, Symmetric marcado — Color: #ffffff.
Selecione a borda.
Edit → Paste Into Selection.
Adjust → Blur → Gaussian Blur — Radius: 20,00.
Adjust → Add/Remove Noise → Add Noise: Uniform e Monochrome marcados — Noise: 12.
Selections → Invert.
Effects → 3D Effects → Drop Shadow: 0 / 0 / 80 / 40,00 — Color: #000000.
Selections → Select None.
Aplique a marca-d'água.
Assine e salve.
Espero que gostem.
Aparecida / LicaCida, outubro de 2013.
Rio de Janeiro - Brasil.


VOLTAR
Copyright ©2026 - Web Design - Naise Minas
|

