|
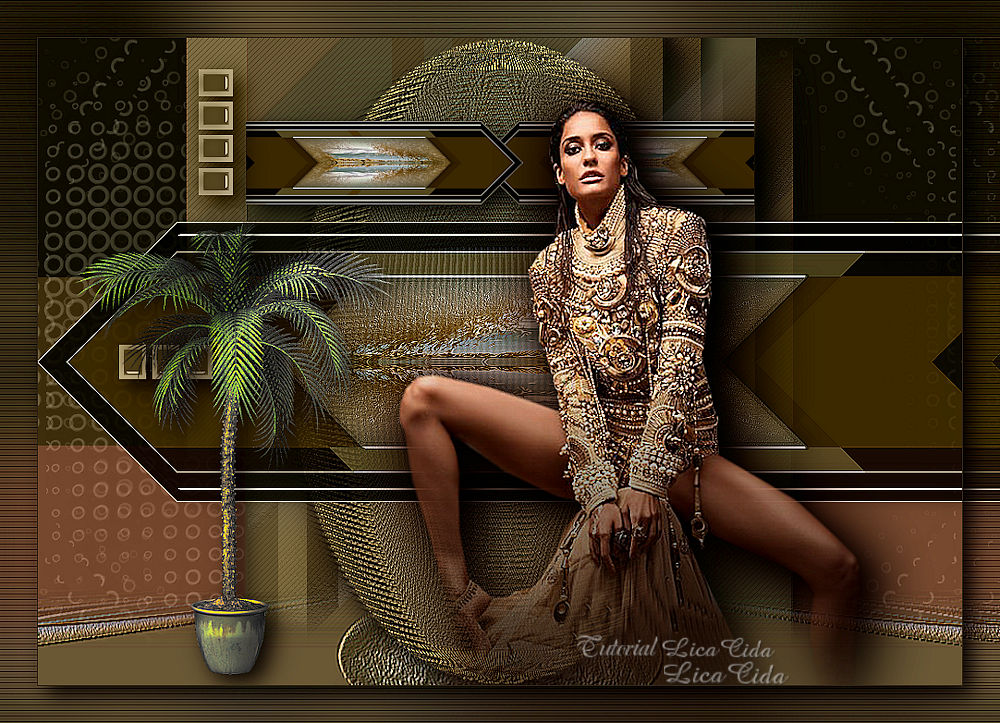
Ella
TRADUÇÕES

MATERIAL

Preset: katrina (mp), do Eye Candy 5: Impact → Glass --
Dê um duplo clique no preset para importá-lo ao plugin.
Tubes: 5120-luzcristina
nena-landscape-5054
Decos: deco arquivonet
deco1lc
R11GardenPotPlant2014-145
Brush: OBG_BRUSH_33 -trabalhadolc
Mask: 002 gradientedworisch
Harry's Button Tools --
Importar para o Filters Unlimited 2 (segue no material).
Marca-d'água.
Efeitos do PSP.
Versão usada: PSP X8.
PLUGINS
Plugin Mosaic ToolKit Plus
Plugin Filters Unlimited 2 → Harry's Button Tools → Flat Button II
Plugin Alien Skin Eye Candy 5: Impact → Glass
Plugin Alien Skin Eye Candy 5: Impact → Perspective Shadow
Plugin Carolaine and Sensibility → CS_Halloween2
Plugin Graphics Plus → Vertical Mirror
Plugin Graphics Plus → Cross Shadow
Plugin AAA Filters → Custom
Plugin MuRa's Meister → Pole Transform
Plugin MuRa's Meister → Perspective Tiling
TUTORIAL
|
Esta seta marca sua linha
Clique e arraste para movê-la
|
|
1_.
Abra uma nova imagem transparente de 1000 x 700 px.
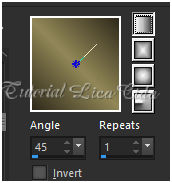
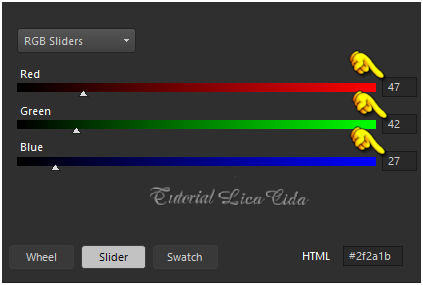
Pinte com o gradiente formado pelas cores retiradas do landscape: #2f2a1b (Foreground) e #918757 (Background).
Configure: Style: Linear — Angle: 45 — Repeats: 1 — Invert desmarcado.
2_.
Selections → Select All.
Edit → Copy no nena-landscape-5054
Edit → Paste Into Selection.
Selections → Select None.
Effects → Image Effects → Seamless Tiling: Default — Transition: 100%.
Adjust → Blur → Gaussian Blur — Radius: 32,00.
3_.
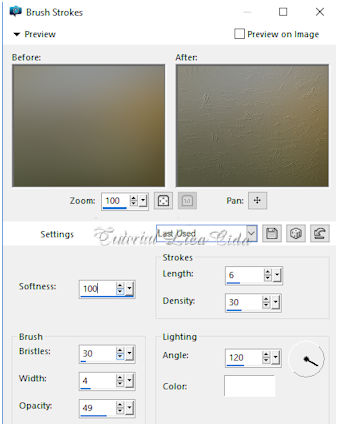
Effects → Art Media Effects → Brush Strokes: 100 / 30 / 4 / 49 — 6 / 30 / 120 — Color: #ffffff.
4_.
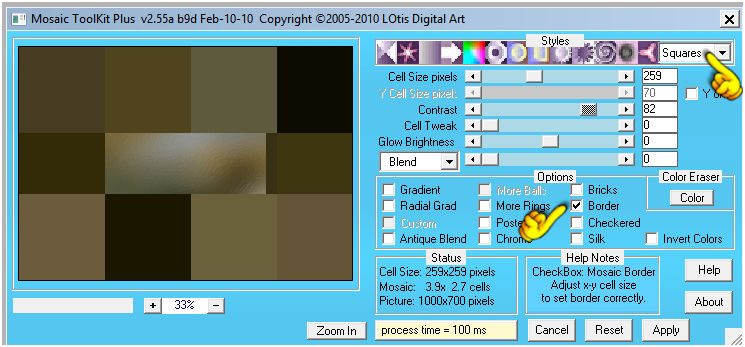
Plugin Mosaic ToolKit Plus.
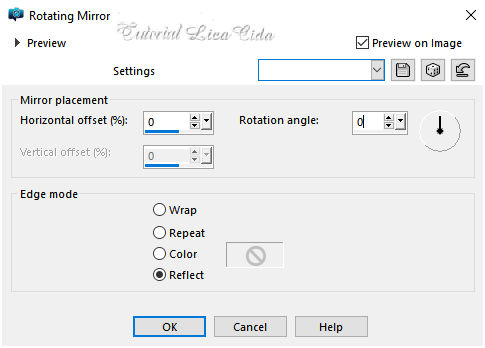
Effects → Reflection Effects → Rotating Mirror.
5_.
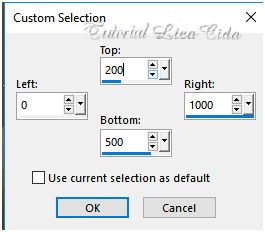
Ative a ferramenta Selection Tool (tecla S) → Custom Selection.
Selections → Promote Selection to Layer.
6_.
Plugin Filters Unlimited 2 → Harry's Button Tools → Flat Button II.
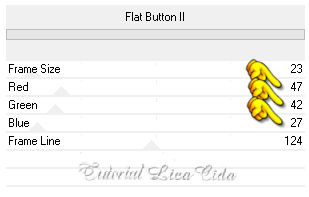
Use os valores marcados de acordo com a cor usada (para criar sua borda).
Usei a cor do Foreground: #2f2a1b.
7_.
Selections → Modify → Contract: 15 px.
8_.
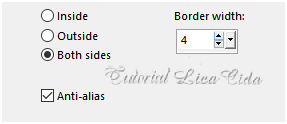
Selections → Modify → Select Selection Borders.
9_.
Plugin Alien Skin Eye Candy 5: Impact → Glass — Settings: User Settings → katrina.
Selections → Select None.
10_.
Ative a ferramenta Selection Tool (tecla S) → Custom Selection 2.
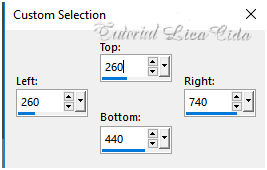
Edit → Copy no nena-landscape-5054
Edit → Paste Into Selection.
Adjust → Sharpness → Sharpen More.
Selections → Modify → Select Selection Borders (print do item 8).
Plugin Alien Skin Eye Candy 5: Impact → Glass — Settings: User Settings → katrina.
Selections → Select None.
Plugin Alien Skin Eye Candy 5: Impact → Perspective Shadow — Blurry.
Retire a visibilidade dessa layer (Promoted Selection).
11_.
Ative a Raster 1.
Com a ferramenta Selection Tool (Default), selecione como mostra o print.
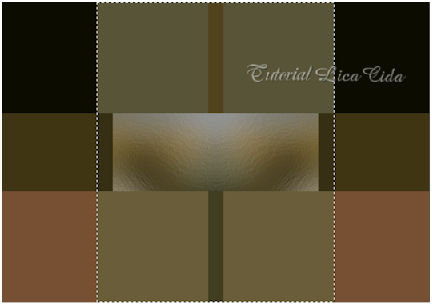
Selections → Promote Selection to Layer.
Selections → Select None.
12_.
Plugin Carolaine and Sensibility → CS_Halloween2 — Default (65 / 0 / 95 / 65).
Plugin Alien Skin Eye Candy 5: Impact → Perspective Shadow — Blurry.
Layers → Duplicate.
13_.
Effects → Distortion Effects → Wave.
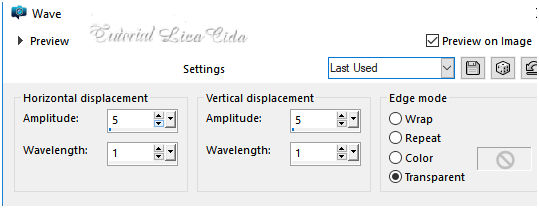
14_.
Effects → Geometric Effects → Circle — Transparent.
Plugin Alien Skin Eye Candy 5: Impact → Perspective Shadow — Blurry.
Layers → Duplicate.
Image → Mirror → Mirror Horizontal.
Layers → Merge → Merge Down.
Adjust → Sharpness → Sharpen.
Effects → User Defined Filter → Emboss_3.
Ative novamente a visibilidade da layer superior (Promoted Selection).
Ative a layer Promoted Selection 1.
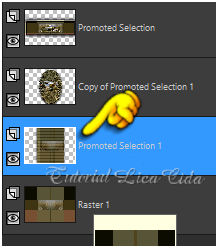
15_.
Effects → Geometric Effects → Skew.
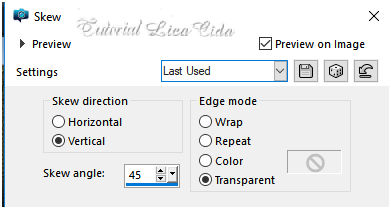
Effects → Image Effects → Seamless Tiling — Stutter diagonal.
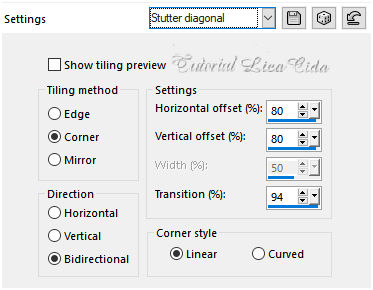
Plugin Alien Skin Eye Candy 5: Impact → Perspective Shadow — Blurry.
Selecione o efeito como mostra o print e pressione a tecla Delete.
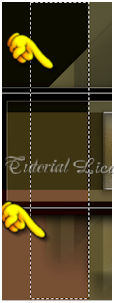
Selections → Select None.
16_.
Ative a Raster 1.
Edit → Copy no deco1lc
Edit → Paste As New Layer.
17_.
Volte para a Raster 1.
Edit → Copy no OBG_BRUSH_33 -trabalhadolc
Edit → Paste As New Layer.
Blend Mode: Luminance (L) — Opacity: 48%.
18_.
Ative a layer superior (Promoted Selection).
Effects → Geometric Effects → Skew.
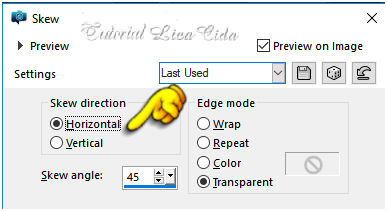
Plugin Graphics Plus → Vertical Mirror — Default (128 / 0).
Adjust → Sharpness → Sharpen.
Plugin AAA Filters → Custom — Landscape (Default).
Layers → Duplicate.
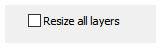
Image → Resize: 30% — Resize all layers desmarcado.
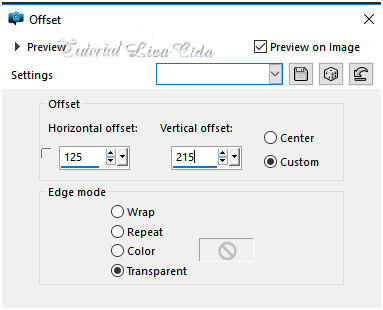
Effects → Image Effects → Offset.
Layers → Duplicate.
Image → Mirror → Mirror Horizontal.
Layers → Merge → Merge Down.
Plugin Alien Skin Eye Candy 5: Impact → Perspective Shadow — Blurry.
LAYERS
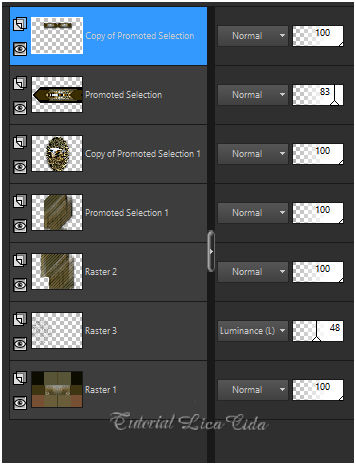
As layers, os Blend Modes e a Opacity estão assim. Observe a Opacity das layers Copy of Promoted Selection e Promoted Selection.
19_.
Ative a Raster 1.
Layers → Duplicate.
Plugin MuRa's Meister → Pole Transform — Default.
20_.
Plugin MuRa's Meister → Perspective Tiling — Height: 15.
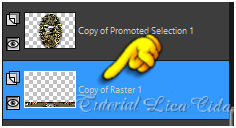
Suba a layer, usando-a abaixo da layer Copy of Promoted Selection 1.
Com a ferramenta Magic Wand — Feather: 60, clique na parte transparente.
Pressione a tecla Delete três ou quatro vezes, para suavizar o efeito.
Selections → Select None.
Adjust → Sharpness → Sharpen.
Effects → User Defined Filter → Emboss_3 (aplique duas vezes).
21_.
Edit → Copy no deco arquivonet
Edit → Paste As New Layer.
Layers → Arrange → Bring to Top.
Blend Mode: Luminance (L).
Use duas vezes, como no modelo.
Layers → Merge → Merge Down.
Plugin Alien Skin Eye Candy 5: Impact → Perspective Shadow — Blurry.
22_.
Edit → Copy no tube 5120-luzcristina
Edit → Paste As New Layer.
Posicione e use a gosto.
Opcional: use uma mask gradiente para realçar o pé (002 gradientedworisch, segue no material).
23_.
Edit → Copy no R11GardenPotPlant2014-145
Edit → Paste As New Layer.
Posicione e use a gosto.
Image → Add Borders: 1 px, Symmetric marcado — Color: #2f2a1b (Foreground).
24_.
Selections → Select All.
Edit → Copy.
Image → Add Borders: 40 px, Symmetric marcado — Color: #ffffff.
Selections → Invert.
25_.
Edit → Paste Into Selection (a imagem copiada no item 24).
Adjust → Blur → Gaussian Blur — Radius: 32,00.
Plugin Graphics Plus → Cross Shadow — Default.
26_.
Plugin Carolaine and Sensibility → CS_Halloween2 — Default (65 / 0 / 95 / 65).
Adjust → Sharpness → Sharpen.
Selections → Invert.
Plugin Alien Skin Eye Candy 5: Impact → Perspective Shadow — Blurry.
Selections → Select None.
Opcional: Plugin AAA Filters → Custom — Sharp (Default).
Image → Resize: Width 1000 px.
Aplique a marca-d'água.
Assine e salve.
Espero que gostem.
Aparecida / LicaCida, janeiro de 2020.
Rio de Janeiro - Brasil.

VOLTAR
Copyright ©2026 - Web Design - Naise Minas
|


