|
Detalhes TRADUÇÕES
MATERIAL
Tubes: 7315-Luz Cristina
Masks: cas_Mask_0518_10
Decor: deco1_lc
Back: colorido_rb2
Marca-d'água.
PLUGINS
Plugin MuRa's Seamless → Emboss at Alpha
TUTORIAL
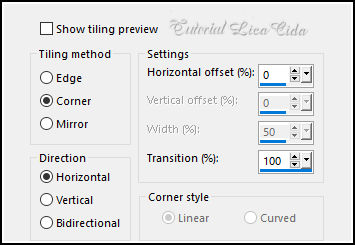
1_. Abra o material no PSP, duplique e feche os originais. Escolha duas cores para trabalhar: Foreground: #ffffff — Background: #c4e1f09 (escolha uma cor clara). 2_. Abra uma nova imagem transparente de 1024 x 600 px. Pinte com a cor do Background: #c4e1f09. 3_. Layers → New Raster Layer. Selections → Select All. Edit → Copy no tube Callitubes-165mistedC Edit → Paste Into Selection. Selections → Select None. 4_. Effects → Image Effects → Seamless Tiling.
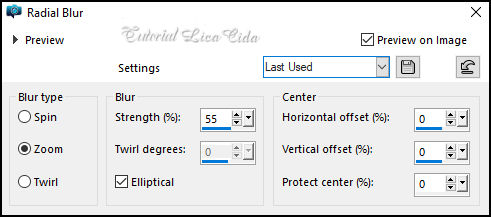
5_. Adjust → Blur → Radial Blur.
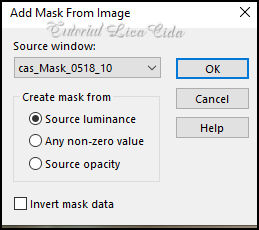
Adjust → Sharpness → Sharpen More. 6_. Layers → New Raster Layer. Pinte com a cor do Foreground: #ffffff. 7_. Layers → New Mask Layer → From Image: cas_Mask_0518_10.
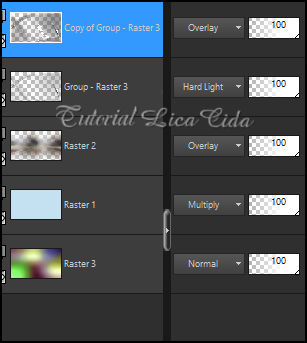
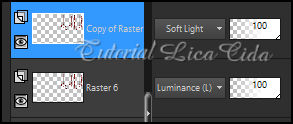
Effects → Edge Effects → Enhance. Layers → Merge → Merge Group. Plugin MuRa's Seamless → Emboss at Alpha: Default. Repita o plugin (Edit → Repeat). Effects → 3D Effects → Drop Shadow: 15 / -10 / 100 / 28,00 — Color: #000000. Layers → Duplicate. Repita o Drop Shadow: -15 / 10 / 100 / 28,00 — Color: #000000. Altere os Blend Modes como no print. OBSERVAÇÃO Fique à vontade para mudar os Blend Modes de acordo com as cores que estiver usando. 8_. Layers → New Raster Layer. Layers → Arrange → Send to Bottom. Selections → Select All. Edit → Copy no back colorido_rb2 Edit → Paste Into Selection. Selections → Select None. LAYERS
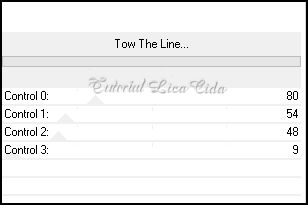
9_. Ative a Raster 2. Plugin Tramages → Tow The Line.
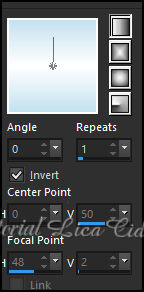
Blend Mode: Overlay. Adjust → Sharpness → Sharpen. 10_. Edit → Copy no deco1_lc Edit → Paste As New Layer (Raster 4). Blend Mode: Screen — Opacity: 79% (aproximadamente). Effects → Edge Effects → Enhance. 11_. Layers → New Raster Layer. Pinte com o gradiente formado pelas cores em uso. Configure: Style: Linear — Angle: 0 — Repeats: 1 — Invert marcado.
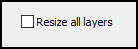
12_. Layers → New Mask Layer → From Image: cas_Mask_0316_02b. Effects → Edge Effects → Enhance. Layers → Merge → Merge Group. Plugin MuRa's Seamless → Emboss at Alpha: Default. Repita o plugin (Edit → Repeat). Effects → 3D Effects → Drop Shadow: 15 / -10 / 100 / 28,00 — Color: #000000. Blend Mode: Hard Light. 13_. Edit → Copy no tube Callitubes-165mistedC Edit → Paste As New Layer. Image → Resize: 90% — Resize all layers desmarcado.
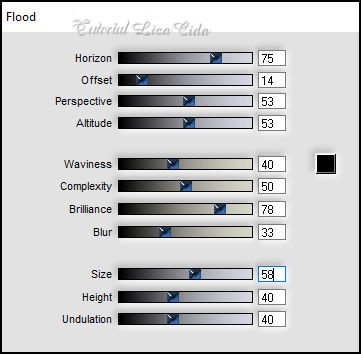
Adjust → Sharpness → Sharpen. Blend Mode: Multiply. 14_. Plugin Flaming Pear → Flood.
Adjust → One Step Photo Fix. Layers → Arrange → Move Down. 15_. Edit → Copy no arquivo net Edit → Paste As New Layer. Objects → Align → Top. Objects → Align → Right. Layers → Duplicate. Observe os Blend Modes:
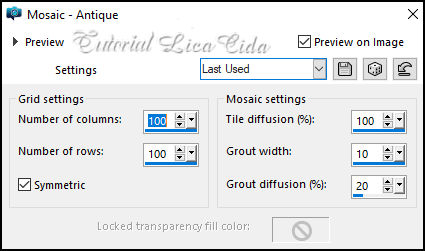
16_. Edit → Copy Special → Copy Merged. Layers → Merge → Merge Visible. 17_. Plugin AAA Filters → Custom → Grain: Default. BORDAS 18_. Image → Add Borders: 1 px, Symmetric marcado — Color: #000000. Image → Add Borders: 3 px, Symmetric marcado — Color: #ffffff. Image → Add Borders: 1 px, Symmetric marcado — Color: #000000. Image → Add Borders: 3 px, Symmetric marcado — Color: #ffffff. Image → Add Borders: 1 px, Symmetric marcado — Color: #000000. Selections → Select All. Image → Add Borders: 50 px, Symmetric marcado — Color: #ffffff. Selections → Invert. Edit → Paste Into Selection. 19_. Adjust → Blur → Radial Blur (print do item 5). 20_. Adjust → Sharpness → Sharpen More. Selections → Invert. Effects → 3D Effects → Drop Shadow: 0 / 0 / 80 / 40,00 — Color: #000000. Selections → Invert. 21_. Effects → Texture Effects → Mosaic - Antique.
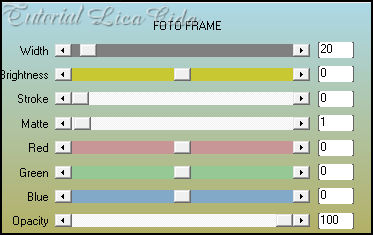
Selections → Select None. 22_. Plugin AAA Frames → Foto Frame.
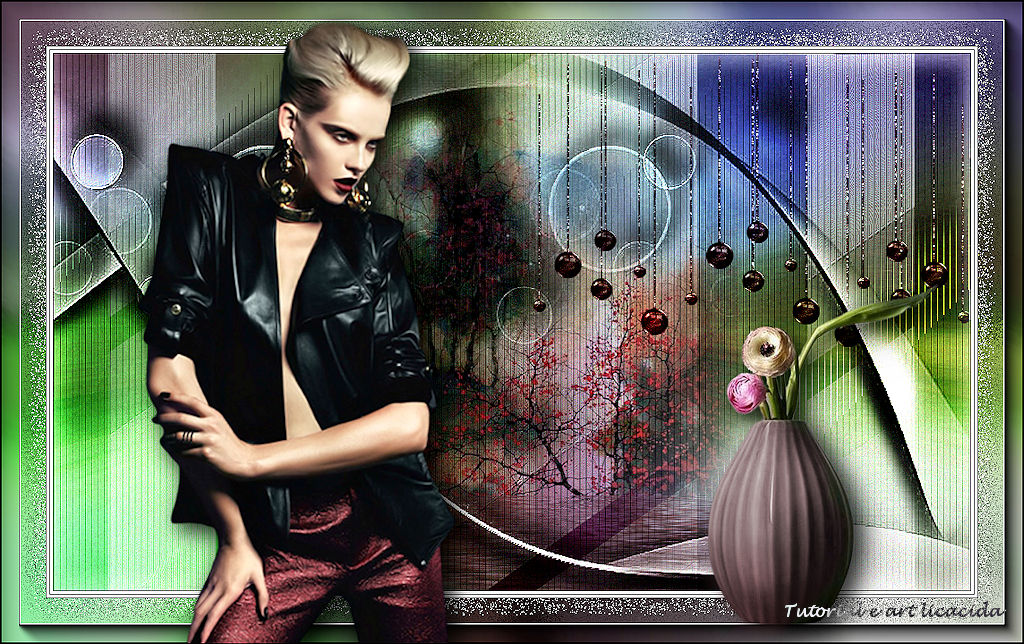
23_. Edit → Copy no tube 7315-Luz Cristina Edit → Paste As New Layer. Posicione. Aplique um Drop Shadow como desejar. 24_. Edit → Copy no tube 092FlorByPqnaAlice Edit → Paste As New Layer. Posicione. Aplique um Drop Shadow como desejar. Aplique a marca-d'água. Assine. Image → Resize — Width: 1024 px. Salve. File → Export → JPEG Optimizer.
Aparecida / LicaCida, julho de 2023.
Copyright ©2026 - Web Design - Naise Minas |