|
Dea Maia
DEDICATÓRIA
Dedicado à querida Deinha, com carinho!!
TRADUÇÕES

MATERIAL

Presets: Illumination → Lights → Preset_Lights_1bllc
Preset_Lights_2bllc
Preset_Lights_3bllc
Preset_Lights_4bllc --
Salvar na pasta Presets do PSP.
Tubes: TubeNP 1123
TubeNP 1124
tubeclaudiaviza-mix51 (1)
Background: JHanna_364 background
Mask: !!!!.mask
Back: coloridorb
Marca-d'água.
Efeitos do PSP.
Versão usada: PSP X5.
PLUGINS
Plugin VM Natural → Splash!
Plugin Unlimited 2.0 → Distortion Filters → Surface Tension
Plugin FM Tile Tools → Blend Emboss
Plugin L en K's → Pia
Plugin MuRa's Meister → Perspective Tiling
Plugin MuRa's Meister → Pole Transform
Plugin Nik Software → Color Efex Pro 3.0 → Bi-Color Filters
TUTORIAL
|
Esta seta marca sua linha
Clique e arraste para movê-la
|
|
1_.
Abra uma nova imagem transparente de 1024 x 600 px.
2_.
Selections → Select All.
Edit → Copy no JHanna_364 background
Edit → Paste Into Selection.
Selections → Select None.
3_.
Selecione os retângulos com a ferramenta Selection Tool (tecla S) — Selection type: Rectangle.
4_.
Selections → Modify → Expand: 3.
5_.
Layers → New Raster Layer.
Edit → Copy no TubeNP 1124 (paisagem)
Edit → Paste Into Selection.
6_.
Effects → 3D Effects → Chisel — Color: #4b4d29.
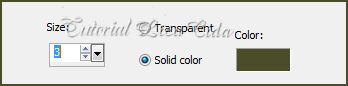
Selections → Select None.
7_.
Edit → Copy nessa layer.
Image → Canvas Size: 1024 x 750 — Bottom: 150.
8_.
Layers → New Raster Layer.
Layers → Arrange → Send to Bottom.
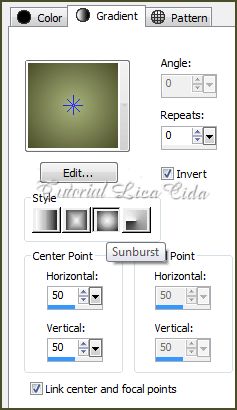
Pinte com o gradiente formado pelas cores #4b4d29 e #a9b47c.
Configure: Style: Sunburst — Repeats: 0 — Invert marcado — Center Point: H: 50 / V: 50.
9_.
Selections → Select All.
Edit → Paste Into Selection.
Selections → Select None.
10_.
Plugin VM Natural → Splash!.
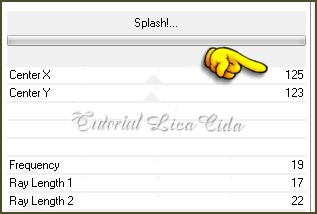
11_.
Plugin Unlimited 2.0 → Distortion Filters → Surface Tension — Default.
12_.
Adjust → Add/Remove Noise → JPEG Artifact Removal — Maximum: 100.
13_.
Plugin FM Tile Tools → Blend Emboss.
14_.
Layers → Duplicate.
Plugin L en K's → Pia: 130.
15_.
Plugin MuRa's Meister → Perspective Tiling.
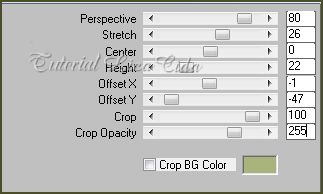
16_.
Effects → Image Effects → Seamless Tiling: Side by side.
Effects → User Defined Filter → Emboss_3.
17_.
Layers → New Mask Layer → From Image: !!!!.mask.
Layers → Merge → Merge Group.
18_.
Ative a Raster 3 e duplique essa layer.
Plugin MuRa's Meister → Pole Transform.
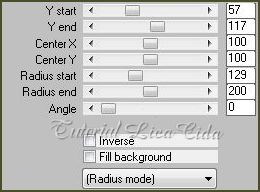
Layers → Arrange → Bring to Top.
19_.
Effects → Distortion Effects → Ripple.
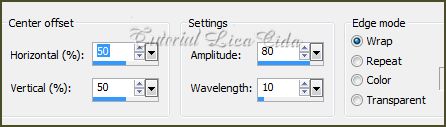
20_.
Effects → Geometric Effects → Spherize — Strength: 100 — Ellipse.
LAYERS
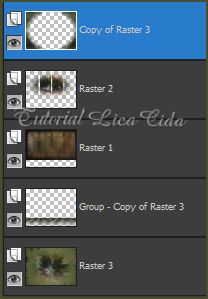
21_.
Ative a Raster 1.
Plugin Nik Software → Color Efex Pro 3.0 → Bi-Color Filters → Cool/Warm 2.
Effects → Illumination Effects → Lights → Preset_Lights_1bllc.
Veja os Blend Modes e a Opacity no print abaixo.
22_.
Ative a Raster 3.
Effects → Illumination Effects → Lights → Preset_Lights_2bllc.
Layers → New Raster Layer.
Selections → Select All.
Edit → Copy no coloridorb
Edit → Paste Into Selection.
Selections → Select None.
23_.
Ative a Group-Copy of Raster 3.
Layers → Arrange → Move Up (duas vezes).
24_.
Ative a Raster 2.
Effects → Illumination Effects → Lights → Preset_Lights_3bllc.
25_.
Ative a layer superior (Copy of Raster 3).
Effects → Illumination Effects → Lights → Preset_Lights_4bllc.
LAYERS
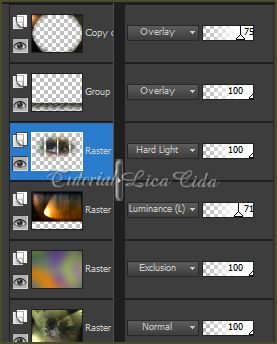
26_.
Edit → Copy no tube TubeNP 1123
Edit → Paste As New Layer.
Redimensione a gosto e posicione.
27_.
Edit → Copy no tube tubeclaudiaviza-mix51 (1)
Edit → Paste As New Layer.
Apague a flor e use a gosto. Posicione.
Aplique a marca-d'água.
Assine e salve.
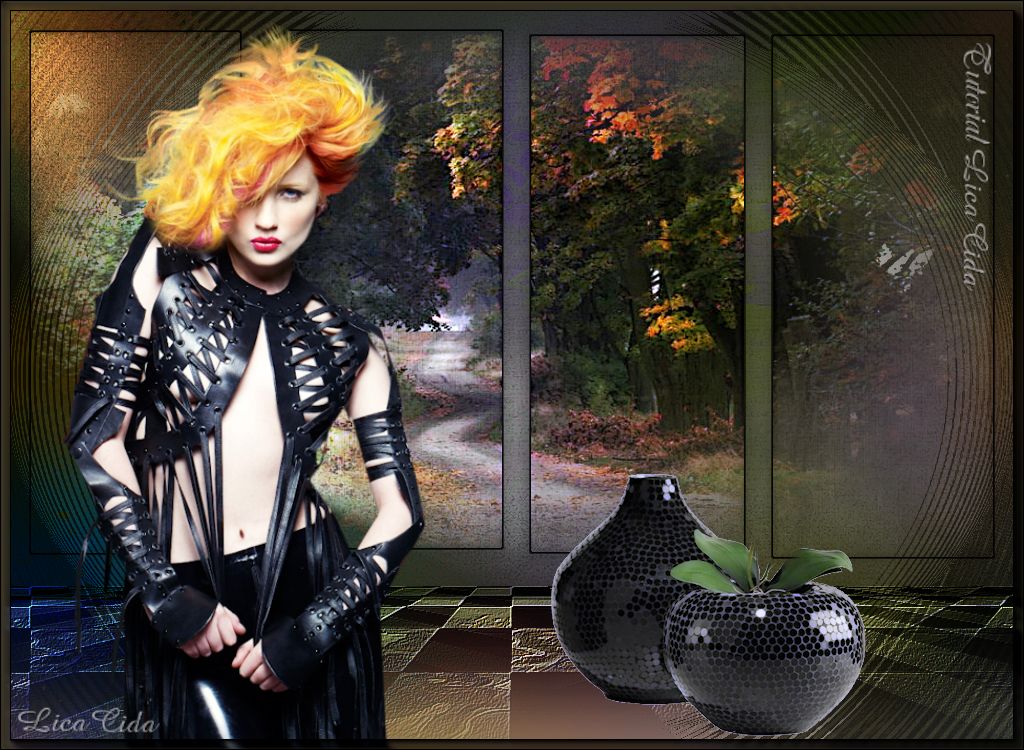
Formate e decore seu top a gosto.
Espero que gostem.
Aparecida / LicaCida, maio de 2013.
Rio de Janeiro - Brasil.

VOLTAR
Copyright ©2026 - Web Design - Naise Minas
|


