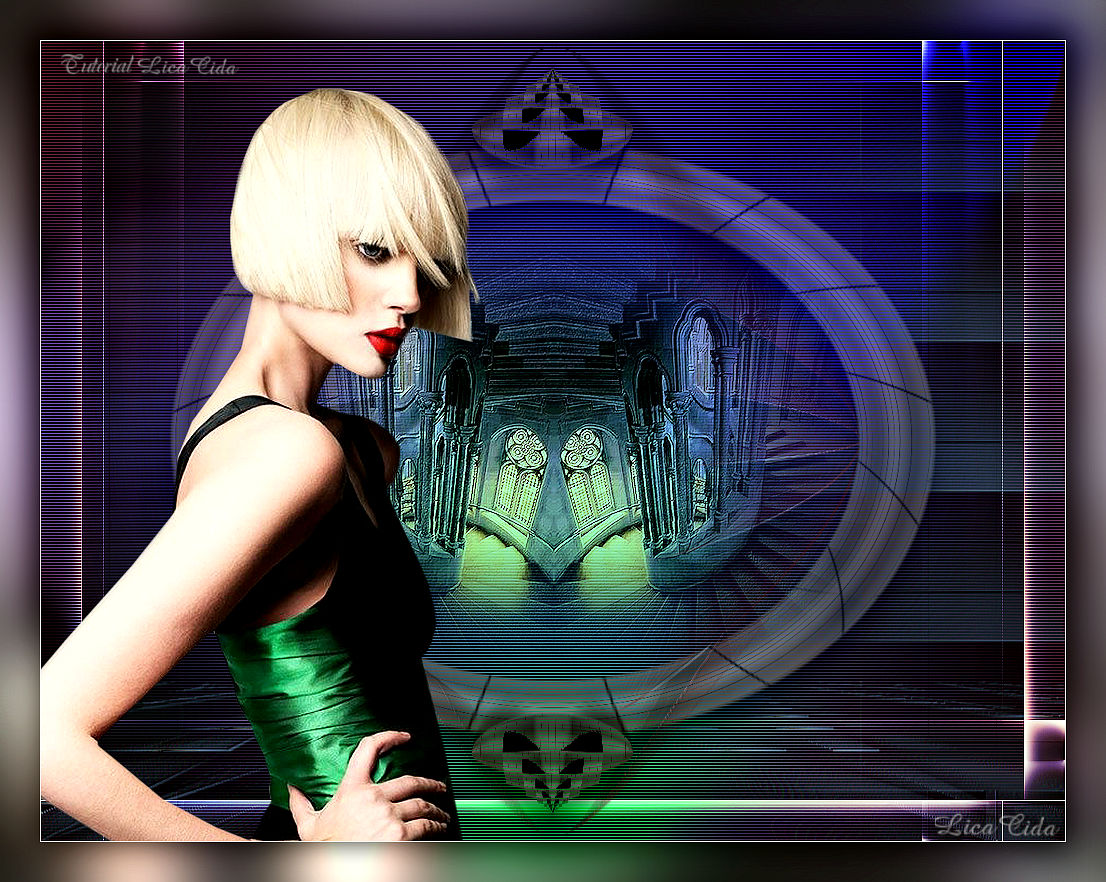
|
Angel Star Com carinho! TRADUÇÕES
MATERIAL
Preset: Illumination → Lights → Preset_Lights_steampunk --
Tubes: 5031-luzcristina
Deco: decolc Texture: Corel_15_001
Marca-d'água.
Versão usada: PSP X8.
PLUGINS
Plugin penta.com → VTR
TUTORIAL
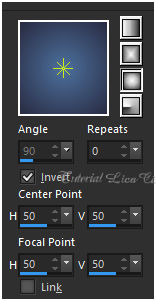
Configure: Foreground: #4d709d — Background: #292b41. 1_. Abra uma nova imagem transparente de 1024 x 800 px. Pinte com o gradiente formado pelas cores acima. Configure: Style: Sunburst — Repeats: 0 — Invert marcado — Center Point: H: 50 / V: 50 — Focal Point: H: 50 / V: 50.
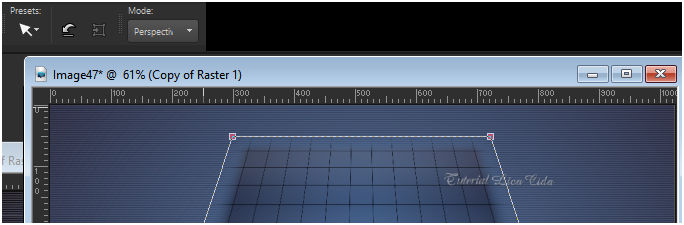
2_. Plugin penta.com → VTR — Default (33 / 1 / 30 / 4). Effects → User Defined Filter → Emboss_3. Layers → Duplicate. Image → Resize: 80% — Resize all layers desmarcado. 3_. Plugin Toadies → Ommadawn — Default (17 / 16 / 234 / 17). View → Rulers (ative a régua). Com a ferramenta Pick Tool (Mode: Perspective): 300 a 720 px.
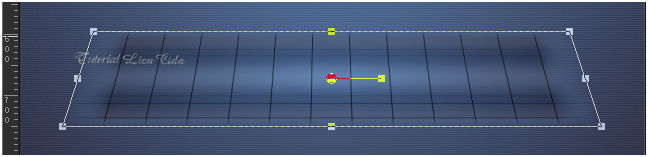
Com a ferramenta Pick Tool (Mode: Scale), desça o efeito até 600 px (confira).
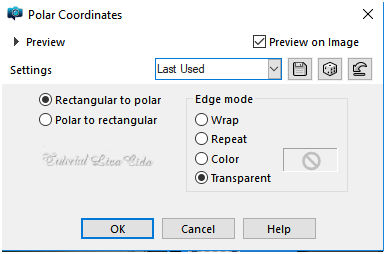
Desative a régua. 4_. Effects → Distortion Effects → Polar Coordinates.
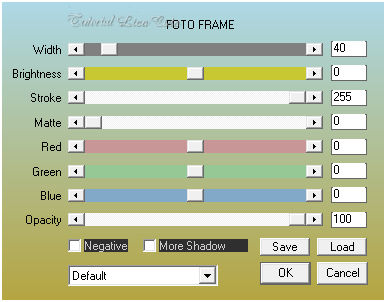
Layers → Duplicate. Image → Mirror → Mirror Vertical. Layers → Merge → Merge Down. Image → Resize: 80% — Resize all layers desmarcado. Effects → 3D Effects → Drop Shadow: 20 / -2 / 50 / 30,00 — Color: #000000. Ative a Raster 1. 5_. Plugin AAA Frames → Foto Frame.
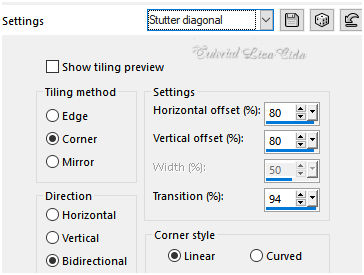
6_. Effects → Image Effects → Seamless Tiling.
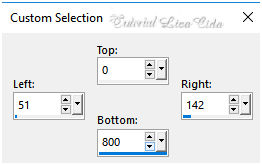
Layers → Duplicate. Image → Mirror → Mirror Horizontal. Blend Mode: Overlay. Layers → Merge → Merge Down. O Blend Mode ficará Normal. 7_. Ative a ferramenta Selection Tool (tecla S) → Custom Selection.
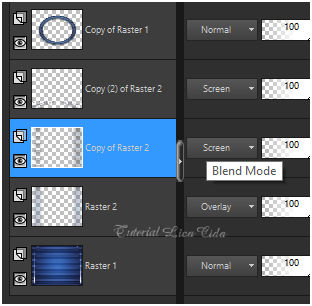
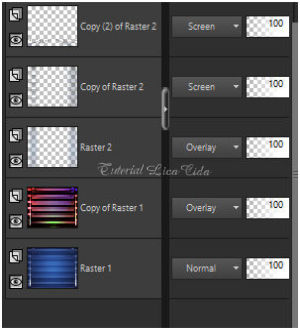
Layers → New Raster Layer. Com a ferramenta Flood Fill (Opacity: 30%), pinte com o mesmo gradiente formado no item 1. Selections → Select None. 8_. Plugin Toadies → Ommadawn — Default (17 / 16 / 234 / 17). Layers → Duplicate. Image → Mirror → Mirror Horizontal. Layers → Merge → Merge Down. Blend Mode: Overlay. Layers → Duplicate. 9_. Plugin Toadies → Weaver — Default (59 / 48 / 222). Blend Mode: Screen. Effects → User Defined Filter → Emboss_3. Layers → Duplicate. 10_. Plugin MuRa's Meister → Perspective Tiling — Default. Repita: Plugin MuRa's Meister → Perspective Tiling — Height: 20 (restante Default). Effects → User Defined Filter → Emboss_3. Opcional: repita o Emboss_3. Blend Mode: Screen. 11_. Ative a Copy of Raster 2.
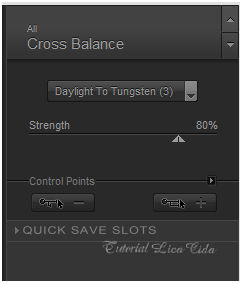
Layers → Duplicate. Effects → Geometric Effects → Circle — Transparent. Blend Mode: Normal. 12_. Effects → Distortion Effects → Pinch — Strength: 100%. Effects → User Defined Filter → Emboss_3. 13_. Ative a Raster 1. Layers → Duplicate. Plugin Nik Software → Color Efex Pro 3.0 → Cross Balance (use a gosto). Blend Mode: Overlay.
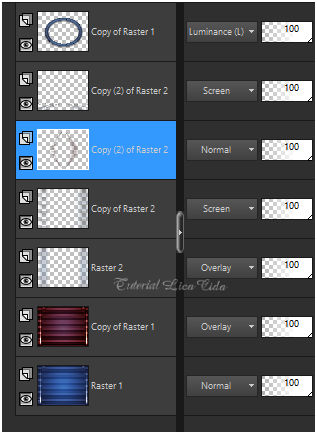
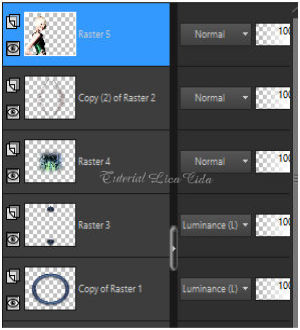
Opcional: nessa layer, Plugin AAA Filters → Custom — Landscape (Default). Repita na layer do Circle Transparent (Copy (2) of Raster 2): Plugin Nik Software → Color Efex Pro 3.0 → Cross Balance (veja o print acima). Altere os Blend Modes e a Opacity das layers. Observe que, na layer superior, o Blend Mode é Luminance (L).
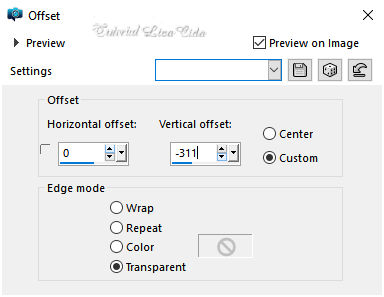
14_. Edit → Copy no decolc Edit → Paste As New Layer. Layers → Arrange → Bring to Top. Effects → Image Effects → Offset.
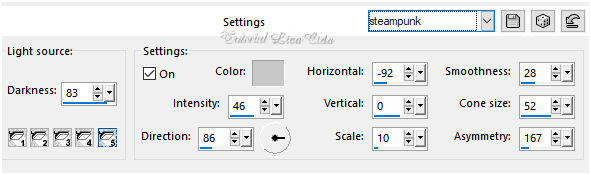
Layers → Duplicate. Image → Mirror → Mirror Vertical. Layers → Merge → Merge Down (Raster 3). Effects → 3D Effects → Drop Shadow: 20 / -2 / 50 / 30,00 — Color: #000000. 15_. Edit → Copy no misted 5054-luzcristina Edit → Paste As New Layer. Image → Resize: 80% — Resize all layers desmarcado. Adjust → Sharpness → Sharpen. 16_. Effects → Illumination Effects → Lights → Preset_Lights_steampunk.
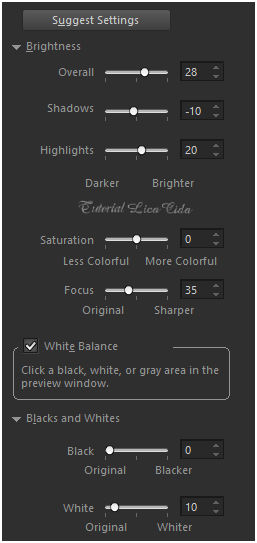
17_. Adjust → Smart Photo Fix.
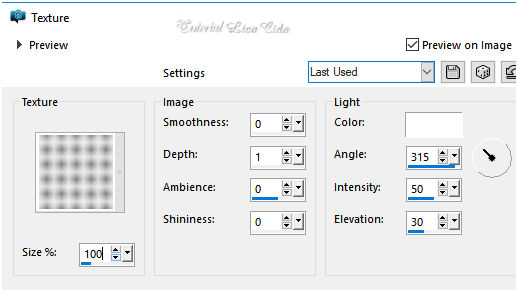
18_. Effects → Texture Effects → Texture.
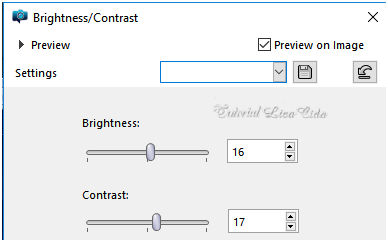
19_. Adjust → Brightness and Contrast → Brightness/Contrast.
A layer do Circle Transparent (Copy (2) of Raster 2) fica acima do misted. 20_. Ative a Copy of Raster 1. Effects → Illumination Effects → Lights → Preset_Lights_steampunk (print do item 16). Adjust → Smart Photo Fix (print do item 17). Adjust → One Step Photo Fix. 21_. Edit → Copy no tube 5031-luzcristina Edit → Paste As New Layer. Adjust → Sharpness → Sharpen. Posicione. Altere os Blend Modes e a Opacity das layers.
22_. Image → Add Borders: 1 px, Symmetric marcado — Color: #ffffff. Edit → Copy. Image → Add Borders: 40 px, Symmetric marcado — Color: #c0c0c0 (cor clara). Selecione a borda. Edit → Paste Into Selection. Adjust → Blur → Gaussian Blur — Radius: 30,00. Plugin Graphics Plus → Cross Shadow — Default. Selections → Invert. Effects → 3D Effects → Drop Shadow: 0 / 0 / 80 / 40,00 — Color: #000000. Selections → Select None. Aplique a marca-d'água. Assine e salve. Espero que gostem.
Aparecida / LicaCida, setembro de 2018.
Copyright ©2026 - Web Design - Naise Minas |